While I guide my client during a 1:1 fitness class at Melbourne Massage and Treatment, a Myotherapy clinic in Fitzroy North, on how to learn using bands or a single-column pulley machine to practice KLT (Kinetic Link Training), I often get asked how someone should or shouldn’t do a lunge. “Should my knee go ahead of my toes?” “Should my knee stay on top of my ankle?” “What about my back? Should I hinge or stay straight?” The answer to those questions lies in a simple fact: what part of the body are you trying to train? Are you aiming to build more glut (posterior chain) or quads (anterior chain)? No, because there is no perfect lunge, as either right or wrong. As per the squat, there is the lunge that works for you, for your presentation and for your goal. The Two Main Lunge Strategies (And Why They Matter) So, when we talk about lunges, most people are really debating between two variations: Knee Travels Forward (Past the Ankle Line) When going for this variation, we have to conceptualise that the knee is going into a deep flexion, right? Now, if the knee has to come out of flexion, the quads are the muscle that needs to be engaged. (Quads are the knee extensors). The deeper the knee flexion, the more quads fibres are engaged to do the reverse to get the extension done. In fact, what this type of lunge does is: Increases knee flexion Increases quadriceps demand Places more load through the patellar tendon Furthermore, research shows that when the knee moves forward, quadriceps force and knee joint stress increase significantly. In a super summary: This is a quad-dominant lunge. Vertical Shin (Knee Stays Over the Ankle) On the other hand, when delivering a lunge movement and the knee stays on top of the ankle, within a vertical shin line, there is a max of 90° knee flexion; therefore, the amount of fibre engaged for the quads is less, and what is than the primary mover for the ascending action, is the gluteus maximum, the biggest glut, which is going to help with the hip extension. So, in this variation, what we are going to achieve is: Shifting the load away from the knee Increases contribution from the hip extensors Encourages more posterior chain involvement Therefore, this will be a glute-focused lunge. What Biomechanics Actually Tell Us About The Lunge Exercise While we look at this movement, we may get triggered into thinking that the lunge exercise is knee-dominant because the knee does a lot of movement, right? Well, if we break it down a bit more, as Riemann et al. (2012) did, we find that yes, the knee moves a lot, but what really takes the load during the lunge movement is the hip. So this is how we can break it down: The knee moves more (kinematics). But the hip produces more force (kinetics). Why this is a thing, then(?) you may ask. Well is tru that the knee move a lot, it can flex up to 90° and still this can be a hip dominant exercises, but, we have to think that the knee, while it is moving that far, is not placing much load on the lower fibers of the quads, and the joint that has to push against gravity, in the ascending phase, are indeed the hip. That’s where all the load actually is. The weight of the upper body. The Lunge Game-Changer: Add a Hip Hinge And here is where we can add a twist to the lunge, by going into hip hinging. What happens if we do so? The glutes are placed under greater stretch at their origin. This increases mechanical tension. You get better glute recruitment and carryover in strength. In fact, this is not just theory, but it’s basic muscle physiology: Muscles produce more force when stretched under load. Therefore, by hinging at the hip, you are not only going to feel more burning sensation in the glutes, but you are going to train them even more effectively. Why Toe Mobility Is the Missing Piece Now let’s talk about something almost no one considers: Your toes. As often happens, the toes and feet are not taken into consideration when looking at functional movement. Even though every leg movement starts from there. In a proper lunge, especially for the rear leg, your toes need enough mobility (extension) to: Accept vertical load Stabilise the movement Prevent your body from shifting forward Indeed, if you lack toe mobility: The movement gets projected forward Load shifts into the front knee and quads You lose posterior chain contribution To support those statements, a study by Harato et al. (2019) examined how foot and toe positioning directly affects knee mechanics and load distribution. So to clarify, the mobility-stability joint chain must always be taken into consideration when we look at functional movement. In this case, your toes aren’t just along for the ride; they’re controlling where the force goes. So… Which Lunge Is Best? I hope that by now, you have an idea of what answer is coming up: Neither. There is no best lunge, as there is no best squat. The forward knee lunge is not “bad”; it’s a tool for quads. The vertical shin lunge is not “safer”; it’s a tool for glutes. The mistakes are thinking that: One can replace the other one. Having an injury in the knee, and thinking that lunges are not your thing anymore. That’s why, at my clinic, Melbourne Massage and Treatment, here in Fitzroy North, I always emphasise to my clients to understand that: “Don’t chase perfect technique — chase the right stimulus.” And to get to a better technique, better than what your body can deliver for now, is a step-by-step journey. And when there is an injury, we have to be confident in the tissue’s healing timeline, and exercises with load are the best tools to help with that. How I Use This With My […]
Tag Archives: squat

Blog
Low Level Laser Therapy in Melbourne: Does It Actually Work?
If you have been at the clinic most recently, you may have heard me talk [...]
Continue readingApr
Blog
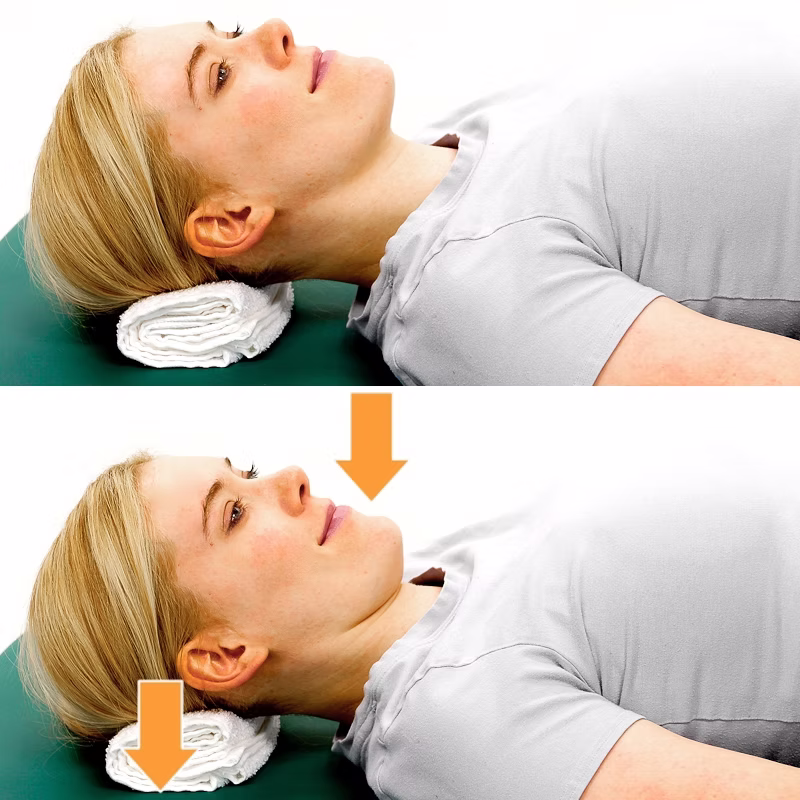
Your Neck Matters! 3 Neck Strengthening Exercises To Stop The Pain
Neck pain is such a common presentation, and often I have to hear from my [...]
Continue readingMar
Blog
There Is No “Perfect” Lunge. Let’s Find Out Why.
While I guide my client during a 1:1 fitness class at Melbourne Massage and Treatment, [...]
Continue readingMar

Blog
Why the Gluteus Medius Is Essential for Balance, Longevity and Fall Prevention
One thing that can really create terror while we age is falling. No matter the [...]
Continue readingMar
Blog
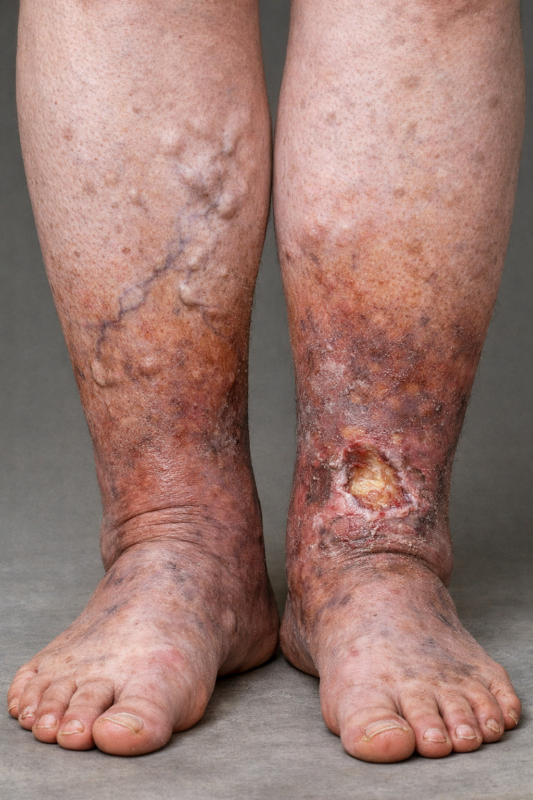
Chronic Venous Insufficiency and Swollen Legs: Compression Is The Way To Go
In Australia, Chronic Venous Insufficiency (CVI) affect more women than men, with a ratio of [...]
Continue readingMar
Feb
Here in Fitzroy North, at my Myotherapy Clinic and 1:1 fitness class studio, I get to work with a wide range of clients, and what I notice is that there is a lack of knowledge and awareness on how to deliver a Glutes Strengthening. And why I believe that a squat is important is simply because squatting is an action that we do so often throughout the day that we all should be good at it, and it is the best functional movement that allows you to reinforce the full body structure. Therefore, when I come across those presentations, I ensure to educate my patients about the basic mechanics of a squat, including mobility, stability, and glutes strengthing. Are You Looking Into Glutes Strengthening? Let’s Check Your Joint Mobility and Stability First In order to deliver effective training for your glutes, including delivering an efficient squat, you will look at: Adequate ankle mobility A well-coordinated hip hinge Stability in fee tarsals and knee joints Those are regular things I would look at during a myotherapy treatment and 1:1 fitness class in Fitzroy North, to improve glute activation, movement efficiency, and injury resilience. Ankle Mobility Exercise to Improve Squat Depth and Lower Limb Mechanics As discussed in greater depth in the mobility and stability blog, before we start looking at strength and start working on functional movement, like the squat, we want to ensure that the mobile joints are mobile enough to deliver the right mechanics. In fact, limited ankle mobility often results in compensatory strategies such as: Excessive forward trunk lean during squats Early heel lift Increased stress on the knees or lumbar spine Clinical Importance of Ankle Mobility Adequate ankle dorsiflexion allows improved tibial progression during squatting movements, enabling more effective hip and glute loading. Exercise: Knee-to-Wall Ankle Dorsiflexion Drill Position the foot flat on the ground, facing a wall Aim for a 10 cm distance between the big toes and the wall Maintain heel contact with the floor Drive the knee forward toward the wall under control Perform slow, controlled repetitions Your aim is to teach the wall with the kneem, with a big toe-wall distance of min. 10 to 12 cm Clinical application:This exercise is commonly prescribed in myotherapy sessions to improve squat mechanics, reduce compensatory loading, and support long-term joint health. Hip Hinge Drill for Posterior Chain Activation and Spinal Control The hip hinge is a fundamental movement pattern required for safe and effective loading of the gluteal muscles, but not only that, indeed, poor hip hinge mechanics often present as excessive lumbar flexion or extension during deadlift-based movements. Why Hip Hinge Mechanics Matter Efficient hip hinging can help with: Increases glute and hamstring activation Reduces lumbar spine strain Improves RDL and deadlift performance Exercise: Wall-Assisted Hip Hinge Drill Stand approximately 20–30 cm from a wall Push the hips posteriorly to make contact with the wall Maintain a neutral spine and rib position Return to standing using glute contraction (squeeze those glutes) Clinical focus:This drill is a key component of both rehabilitation and performance-based programming at Melbourne Massage and Treatment. It is also a fundamental movement pattern taught in my glute-focused fitness classes, ensuring clients build strength safely and efficiently. Stability Starts From Your Feet Foot stability is a crucial part of delivering a good squat, especially during a low-bar squat, when feet are flat on the ground. Imagine your feet unable to give a stable direction to whatever is above, like the ankle, knee and hip. This would lead to knee shaking during squatting, and once the squat load increases, the risk of injury rises. So for foot stability, we look at: Even weight distribution of your load along the plantar of the feet, not only on your toes or on the heel. All toes, grabbing the floor, throughout the squat performance Lower-bar squat, feet flat on the floor (be barefoot or use gambaletto type of shoes) and feet wider than hip, stand in slight external rotation High-bar squat, feet open wide as hip stand (so a narrow stand) and heel well elevated. In both my clinical work and my strength-based fitness classes, foot stability is always assessed first. On the other hand, more about the high and low bar squat is available from this blog. Squats for Functional Glutes Strengthening In my glute-strengthening fitness class sessions, the squat is one of the primary movements we refine. Keep in mind that when we talk about squat for glut strength, we always refer to the lower-bar squat. Therefore, when performed with appropriate technique, this exercise is the most effective exercise for developing functional glutes strenghtening and improving lower-limb coordination. Below, you will find the most common Clinical Faults in Squatting Limited ankle mobility restricting depth Poor hip control resulting in lumbar compensation Reduced gluteus contribution due to motor control deficits So this is what you need to focus on to for a Optimal Glute Engagement while squatting: Maintain even foot pressure throughout the movement Maintain spinal alignment and controlled descent Drive upward through the heels and mid-foot Clinical note:Squat depth should be dictated by movement quality rather than arbitrary range targets. Romanian Deadlifts (RDLs) Another Glutes strengthening Exercise The Romanian deadlift, in comparison to the conventional deadlift, is a partial movement, where the load never touch the ground throughout the exercise (once it gets picked off the ground). This type of lift is ideal for exercising the posterior chain, particularly in the gluteal and hamstring musculature. Benefits of RDLs in Myotherapy and Strength Training Enhances glute and hamstring load tolerance Improves hip-dominant movement capacity Reduces injury risk through controlled eccentric loading RDL Execution Guidelines Maintain close bar or weight proximity to the body Initiate movement via hip hinge, not knee flexion Maintain spinal neutrality throughout the range Terminate the movement when pelvic control is lost Clinical relevance:RDLs are regularly integrated into rehabilitation and strength programs for clients with lower back pain or who are returning to lifting after injury. But are also ideal to build […]

May
As a Clinical Myotherapist, I often work with patients who perform back squats as part of their exercise routine, and at the question: “What’s your goal with a back squat?” the answer is often vague and not specific to what this exercise is for. The reason why the answer is not specific is simply because they don’t know what the difference is between high and lower bar squat, and don’t know that the back squat, as long as it is an amazing functional movement, doesn’t train all the lower body muscles at the same level. That’s where, to prevent injury, to perform better squats, and to strengthen more evenly all the lower body muscles, I would suggest them to do exercises like: Quads curl, Hamstring curl, Cable Machine Adduction and Diagonal Extension (Glute Medius). Back Squat: The Foundation of Strength The back squat is such a great form of exercise because it trains multiple joints and multiple muscles all at once, but also allows us to use our innate capacity of squatting, which is a functional movement, to move high loads, therefore achieving more strength gains. However, this leaves us with more responsibility to train smartly. So let’s start to break down the two main types of back squat: High-Bar Back Squat (Upper Bar Position) The bar rests on the upper traps The torso remains more upright Greater emphasis on the quadriceps muscles Ideal if your goal is quad strength and knee-dominant movement patterns Ideally, you are standing with your heels elevated from the ground The fact that the bar is sitting on the upper traps, and that the torso sits straighter, would lead to a descending movement where your back thigh (hamstrings) would lean on calf muscles, and from there you will stand back up. This is why you put more force throughout the quads. Indeed, the combination of a higher bar, a straighter torso, and a reduced descending position allows the weight to sit in the middle of the centre of gravity, which is placed more posteriorly than in a lower-bar back squat. Low-Bar Back Squat (Lower Bar Position) Bar rests lower on the rear deltoids Torso leans forward slightly more Greater load on the glutes and posterior chain Favoured by powerlifters Best for developing hip strength and glute activation Ideally, your feet are nice and flat on the ground from heel to toes. On the other hand, the lower-bar back squat, as anticipated, is more for the posterior chain muscles, like the gluteus max. This is possible because the bending forward of the trunk stretches more muscle fibres in their origin point (the posterior aspect of the ilium (the pelvic bone), the sacrum, and the coccyx), allowing more fibre contraction in the ascending movement. Also, the lower position of the bar and the bending of the torso maintain the weight in the middle of the centre of mass, which is pushed forward at this time. How about if I cannot squat deep? The depth of a squat is the distance that you can cover from a standing position to the lowest point you can reach. How deep you can squat will definitely change which muscle groups you can activate, but not everyone can squat deep —and that’s absolutely ok. Each of us has biomechanics that are different, due to differences in how the skeleton is shaped. Without going into many details in this blog, we can definitely say that those who have a longer femur would have a harder time going for a deep squat, compared to those who have a shorter femur. The femur’s length is compared to that of the torso. But this is not all, indeed, there are also other femur and hip characteristics that can limit how deep you can squat, such as an anteverted or retroverted femur head. Other conditions that can get in the way while you squat are hip impingement. Accessory Work for a Complete Lower Leg Program So, knowing when and why to use each back squat variation can help tailor your program toward specific goals or help rehab muscle imbalances through focused intent. No squat is right, no squat is wrong; it is all about your goal. However, we need to add work more specifically with other exercises for strength symmetry, muscle activation, and injury prevention. Quad Curl (Leg Extension) Isolates the quadriceps Improves knee tracking and squat depth Essential in rehab for knee pain or quad weakness Quads curl can be done in many ways, with a cable machine or on a bench with a quads curl attachment, but even with a kettlebell or resistance band. It all depends on your setup. As per all the exercises, be consistent with your set-up and progressions. What I prefer most for my training, and what I offer to my patients during the fitness class, is to do quad curls on a bench with the attachment for quad curls. The advantages of this set-up are: Confort Easy progressions Easy set-up Inclination of the back at about 45° to 65° and slight elevation of the quads. The last point is essential to ensure we engage both ends of the quadriceps femoris, which is one of the four quads, that crosses both the hip and knee joints. Hamstring Curl Focuses on the hamstrings, which during a squat are often undertrained Strengthens the back of the thigh and supports knee stability A must-have for runners and athletes prone to hamstring strains As per the quad curl, even the hamstring curl can be done with different variations; there is never one way to train those muscles, but again, it is all about the efficiency and the amount of load that we can put through the muscle, which makes a difference. And again, what I can offer at Melbourne Massage and Treatment, in Fitzroy North, is to do these exercises on a bench, using this time a lower inclination for the upper body (which is now in a prone position) so that the origin of […]