

Exercise is the ultimate medicine for longevity and well-being. That said, there are different ways to exercise, and you should choose which one based on your goals and needs. Ultimately, even if you will prioritise one type of exercise over others, training in different ways, it is the best option to build resilience, strength and obtain the best results. But what are these main ways of training? Well, in this blog, we are talking about Strength Training and Hypertrophy. At Melbourne Massage and Treatment in Coburg, I help people achieve this goal, with tailored injury recovery Myotherapy plans that may start with hands-on treatment but aim to get the person moving and moving under load. What Is Strength Training? Strength training, in its pure form, is a type of training that aims to improve the body’s ability to produce maximal force. This is possible by optimising the nervous system’s capacity to communicate to the muscles what action has to be delivered when placed under load. In fact, the goal isn’t necessarily to make muscles bigger, but to make them stronger. Here is a breakdown of what a strength training session would be like: Typical rep range: 1–6 repetitions per set Load: Heavy (80–100% of your one-rep max) Rest periods: Longer (2–5 minutes) Primary outcome: Improved neural efficiency — your brain and muscles learn to work together more effectively. This type of training benefits everyone, from athletes to everyday movers, by: Enhancing joint stability Improving bone density Increasing functional power for daily tasks. What Is Hypertrophy Training? Now, we will examine another form of training that aims to increase muscle size. Indeed, hypertrophy focuses on creating controlled muscular fatigue that stimulates growth in the muscle fibres. Here’s how it works: Typical rep range: 6–12 repetitions per set Load: Moderate (60–80% of your one-rep max) Rest periods: Shorter (30–90 seconds) Primary outcome: Increased muscle cross-sectional area (growth). Hypertrophy is popular for aesthetic goals, but it also has significant benefits for: Joint support Posture Injury prevention, especially when paired with proper mobility and recovery practices like myotherapy. Who Would Benefit from Strength and Hypertrophy Training? Let’s be clear that both styles of resistance training can benefit a wide range of people — not just athletes or bodybuilders. But here is a clearer breakdown of which training belongs to which goals: You’ll benefit from strength training if you: Want to improve performance in sports or daily activities that require lifting, pushing, or pulling. You are seeking to increase bone density and joint stability, especially as you age. This is a big one for menopausal women. Need to enhance posture and core control to reduce the risk of back or shoulder pain. Are recovering from injury and looking to restore functional movement patterns safely under guidance. You’ll benefit from hypertrophy training if you: Want to build muscle mass for aesthetics, strength, or body composition. You are addressing muscle imbalances or weaknesses identified during myotherapy assessments. Need more joint support and stability through improved muscular structure. Aim to boost metabolism and energy expenditure through increased muscle tissue. At Melbourne Massage and Treatment, I often integrate tailored exercise advice with fitness class sessions, helping clients find the right balance between strength, mobility, and recovery for their individual goals. Massage Therapy, Dry Needling, and the Role of Passive Treatment Massage therapy, dry needling, and other forms of passive therapy are valuable tools during the recovery phase of an injury or when pain and tension are high. They help by: Reducing muscle tension and spasm Improving blood flow and assisting with tissue healing Calming the nervous system and reducing protective muscle guarding Restoring short-term mobility to prepare the body for movement At my Coburg clinic, these treatments are often used early in a client’s recovery journey to reduce pain and restore comfort. However, while these therapies are excellent for short-term relief and acute recovery, they must eventually be paired with movement under load to create lasting change. Why Movement Under Load Is Essential for Long-Term Wellness Passive treatments can help you feel better, but loaded movement enables you to function better. When you progressively load muscles, tendons, and joints, your body adapts and becomes stronger and more resilient. This is what keeps pain away in the long term. Here is a practical and simplified explanation: “You have to think that the body, while it does age, it does slow down in any form of its metabolism, including the regeneration of tissues, which gets worn down, and finds it difficult to be regenerated. This is where movement under load plays a crucial role. Movement under load indeed, it is the stimulus that the central nervous system needs to maintain the body’s regeneration active and effective”. A further breakdown of why movement under load matters beyond recovery: Builds tissue resilience: Strengthens muscles and connective tissue to handle daily demands. Supports nervous system retraining: Teaches your body to move efficiently and safely. Improves joint health and posture: Strengthens stabilising muscles that protect joints. Reduces recurrence of pain: Prevents the same issues from returning by addressing root causes, not just symptoms. Another way I would express the difference between passive therapy and exercises (under load) to my patient is: “Massage and needling help you feel good now, but movement under load helps you stay good later.” That’s why our approach combines hands-on therapy to relieve pain with movement education and strengthening to keep you moving well long after your treatment. How Myotherapy Complements Strength and Hypertrophy Training Myotherapy is a form of manual therapy that aims to improve the performance of any individual who has gone through an injury or someone who wants to maintain functionality and wellbeing. In a Myotherapy session, we would start with some form of testing to evaluate the person’s capacity in mobility and strength and from there we create a treatment plan that aims to improve the current presentation. A treatment plan may include: Soft tissue therapy Corrective exercise Movement assessment Goals of myotherapy: Address muscular imbalances from repetitive […]
Category Archives: Blog

Blog
Facet Joint Irritation and Muscle Weakness: What You Need To Know
In my experience as a Clinical Myotherapist at Melbourne Massage and Treatment Myotherapy and Lymphoedema [...]
Continue readingOct

Blog
Chronic Pain: What it is, and what can you do about it?
Pain is something that we all experience, and it can start after an injury, during [...]
Continue readingOct
Blog
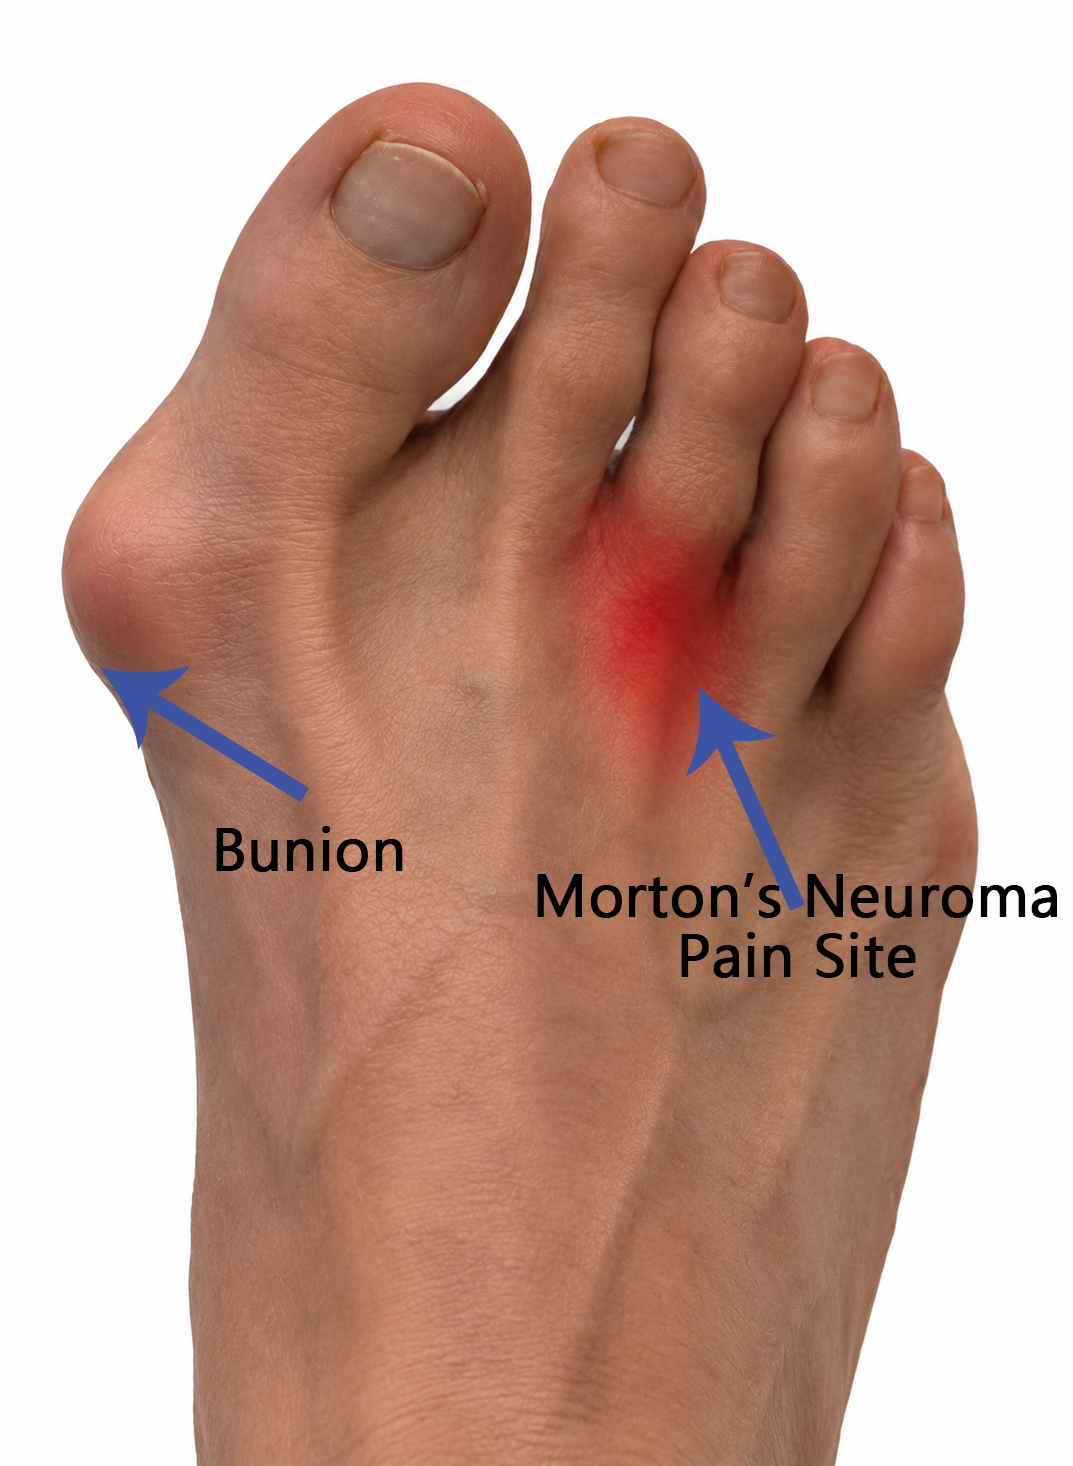
Bunion and Morton’s Neuroma: Can a Bunion Affect Neuroma Recovery?
While a bunion and a Morton’s neuroma are two different foot conditions, if they are [...]
Continue readingSep
Blog
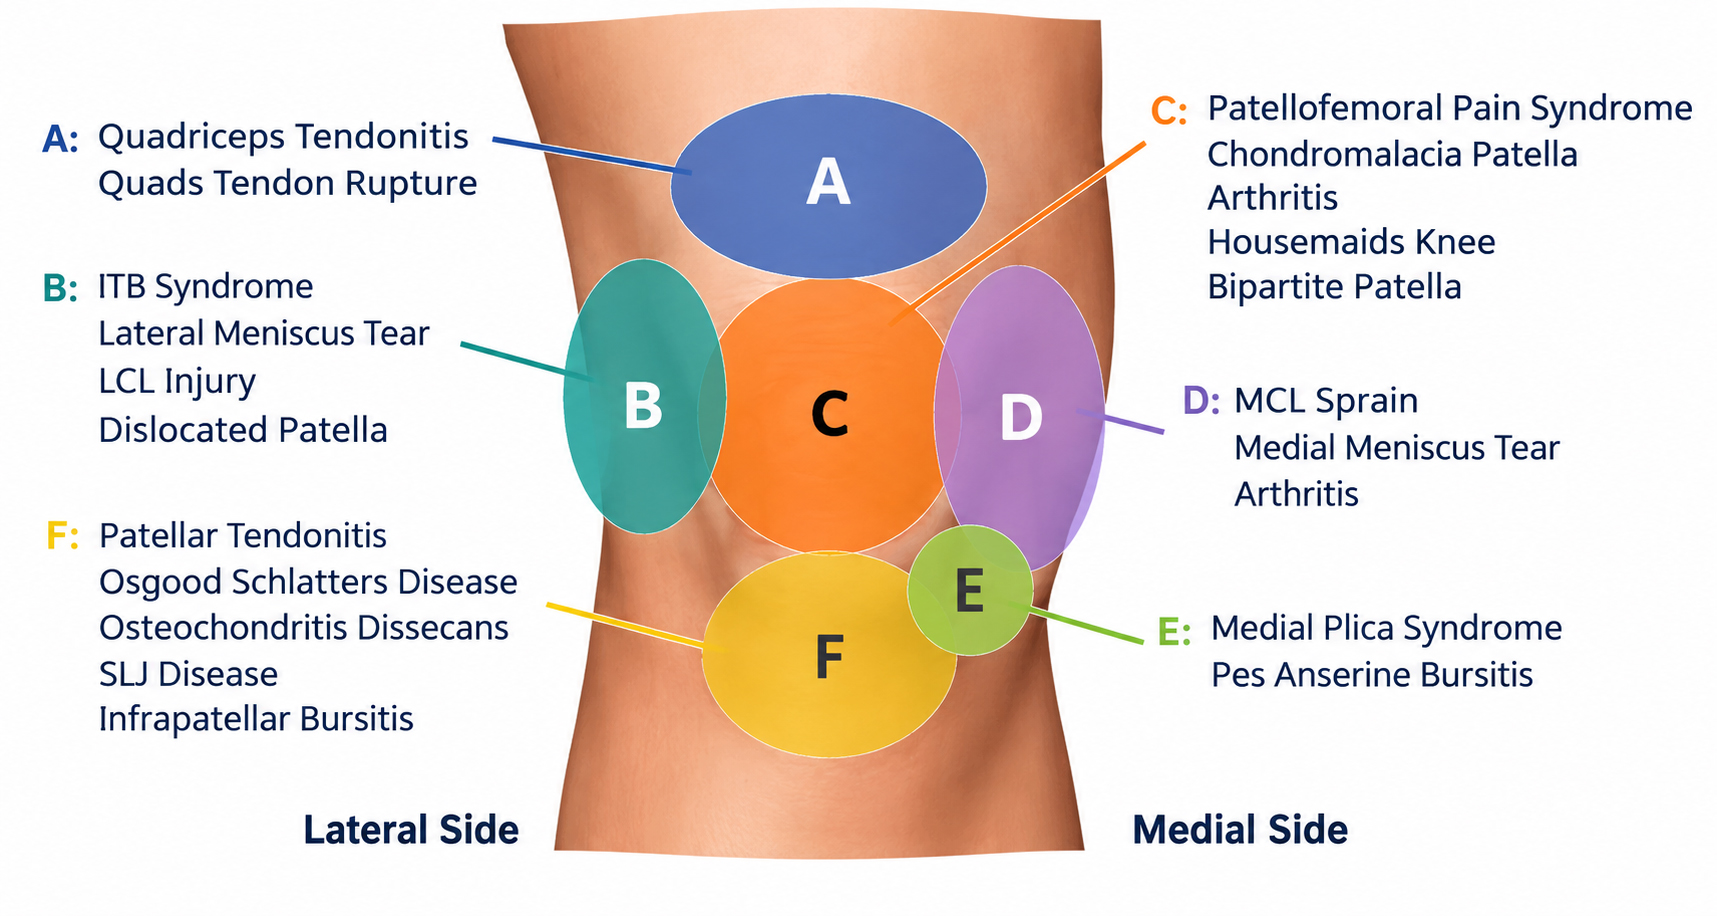
Knee Pain in Coburg
Knee pain is a common form of injury and can affect people of all ages [...]
Continue readingSep

Blog
Post-Surgery MLD Melbourne – Vodder MLD Therapist
Any form of surgery is an invasive procedure for the body to deal with, and [...]
Continue readingSep

Oct
Experiencing a vertebral fracture can be an overwhelming and challenging experience to recover from, but this doesn’t mean there is no safe protocol and successful treatment pathway out there. At Melbourne Massage and Treatment, I am here to assist you in this complex journey, which could be by offering MLD treatment, Myotherapy or Fitness Class. But let’s first understand what fractured vertebrae mean, and what we have to be aware of when working with this type of injury. Spinal Damage vs. No Spinal Damage Let’s start to look into what difference makes to have a spinal fracture where the spinal cord was injured and where it was not. With spinal cord damage, a fracture may injure the spinal cord or nerves, leading to severe symptoms such as numbness, weakness, or paralysis. These cases are medical emergencies requiring hospital care. The rehabilitation process for someone who encounters spinal damage varies based on the severity of the injury. Surgery may be necessary to repair the nerve, but there is also the fact to consider that there may not be a recovery option and life paralysis (quadriplegic or paraplegic) as an outcome. Without spinal cord damage, it is a result of a bone fracture only, without affecting the cord. These are painful but often managed with an initial period of rest and bracing and gradual rehabilitation. At our Coburg clinic, Giovanni carefully assesses your needs and works alongside your medical team to provide safe and effective rehabilitation. Cervical, Thoracic, and Lumbar Vertebrae Your spine has three main regions, and fractures behave differently depending on location: Cervical (neck): Mobile but delicate; fractures here can have severe consequences. Thoracic (mid-back): Stabilised by the rib cage, but injuries here often come from higher-energy impacts. Lumbar (lower back): These vertebrae carry the body’s weight, so fractures here cause significant pain and restricted movement. Based on where the fracture is, the treatment and recovery options and plans differ. Scans for Diagnosis To properly understand the type of fracture and the severity of the fracture itself, scans are essential. Here is a short list of what diagnostic scans are available and which are most commonly used, and why: X-ray: The first step to confirm a fracture. This type of test is good to see the fracture at the bond level; it is quick, but as a downside, it exposes you to radiation. CT scan: Provides detailed 3D imaging to assess the fracture’s stability. The downside of a CT scan is that, as it is based on X-Ray technology, it can still expose you to radiation, and it can take longer to be delivered, and it is essential to be lying down while receiving the scan. MRI scan: Compared to X-Ray technology, MRI scan would not expose you to radiation, and is used to detect any involvement of nerves, discs, or the spinal cord along the fracture, as this type of scan is used for water-based tissue in the body, and not bones. These scans help guide safe rehabilitation, ensuring the right treatment approach from day one. Something else to keep in mind from the result of the scan is that not everything that a scan shows must impact your life. Indeed, a building disk may show in your scan, but that doesn’t mean that that specific pathology is something related to your spine fracture (it may have been there already before), and that doesn’t mean the body would not look after it while you are recovering from the spine injury. Types of Vertebral Fracture Common fracture types include: Compression fracture – vertebra collapses, often linked to osteoporosis (also called a wedging fracture). Burst fracture – bone shatters outward, sometimes threatening the spinal cord. Flexion-distraction fracture – usually from high-speed accidents where the spine bends suddenly. Fracture-dislocation – bone and soft tissues are displaced, often requiring surgery. Avulsion – It is a type of stress fracture, characterised by a small piece of bone pulled away from the main bone by a muscle or ligament (typical along the transverse process). Mechanism of Injury Fractures can occur from: High-energy trauma – car accidents, falls, sports collisions. Low-energy stress – in osteoporosis, even coughing or bending can trigger a fracture. Scheuermann’s disease – in this specific condition, the vertebrae may grow at different heights compared to the sagittal plane. A meticulous clinical history intake can help in figuring out he chance of you suffering from a vertebral fracture. Healing Time and Recovery As per all non-complex bone fractures, most vertebral fractures take 8–12 weeks to heal, even if recovery varies depending on age, bone health, and whether surgery was required. What we know is that nothing can actually boost the healing, but different therapies, active and passive, can help in assisting the healing process, ensuring a positive outcome. What then can be done during the recovery time is: Early phase: Pain management and protection of the fracture. Rehabilitation phase: Gentle guided movement, strengthening, and improving mobility. With myotherapy support, clients can return to safe daily activities while minimising the risk of re-injury. What to Avoid in the Early Stages of a Vertebral Fracture As mentioned earlier, in the early stage of vertebral fracture, it is important to prevent further damage to the spine and wear a corset that helps in stabilising the spine, while the body is starting the calcification of the bone. Even though you may wear a support, you will want to avoid: Heavy lifting, twisting, or bending movements. Prolonged sitting without support. High-impact exercise or activities. Movement is still recommended, as it can still promote fluid movement and relaxation. Therefore, it is possible to go for walks, move your arms, and move your legs even if in a seated position. Manual Lymphatic Drainage Massage in the Early Phase of a Vertebral Fracture At Melbourne Massage and Treatment, I got to offer MLD as a form of treatment for relaxation, which can have a positive impact on pain perception and tension relief from the spine area. MLD is a gentle touch, […]

Sep
Within the last few years, cosmetic surgeries have been on the rise in Australia. These types of interventions can be helpful for quick body changes. Still, the recovery process post-surgery is often underestimated and misinterpreted, especially when, past a couple of days or just a few weeks, the body’s response to surgery leaves behind hard lumps, thick skin, and reduced sensitivity. The thickened skin and lumps are simply fibrosis, and the reduced sensitivity results from damaged nervous system endings. At Melbourne Massage and Treatment in Coburg, I specialise in Manual Lymphatic Drainage (MLD) using the Vodder technique, helping clients reduce swelling, assisting with recovery, and breaking down fibrosis post-cosmetic surgery, safely and effectively. If you’re looking for post-surgery care in Coburg or Melbourne, here’s how MLD can support your recovery and improve your results. What is Fibrosis After Cosmetic Surgery? Fibrosis formation post-cosmetic surgery is the result of tissue damage that occurred during the surgery. When going for an intervention like liposuction, where fat is removed from the body (either at the abdominal level, arms, legs or elsewhere), the body, to replace the void left by the fat removal, builds up fibrotic tissue. The fibrotic tissue is mainly made of collagen. While this reaction is natural, it can often cause: Hard lumps or nodules under the skin; Uneven skin contour or texture; Tightness or restricted mobility; Tenderness or discomfort. There is no real way around those types of side effects post-liposuction, at least in the short term, and the body would take weeks to recover fully (up to 3 months). That said, everybody reacts differently to this type of intervention, and based on the type of intervention received, the recovery process can vary. Who Benefits Most From Lymphatic Drainage Massage After Cosmetic Surgery? Here is a short list of cosmetic surgery interventions that are going to leave you with fibrosis in the post-surgery time, and that would benefit from Lymphatic Drainage Massage intervention: Liposuction (abdomen, thighs, arms, chin) – This includes liposuction for Lipoedema management too. Tummy tuck – Either due to post-liposuction or from severe weight loss. Breast surgery (augmentation, reduction, reconstruction) – If this is due to breast cancer, one should be aware of any risk of Lymphoedema development. Facelifts and neck lifts Brazilian Butt Lift (BBL) – This type of intervention requires fat to be removed from other body parts, as the abdomen, and that’s where fibrosis would build up. How MLD Helps Reduce Fibrosis Manual Lymphatic Drainage (MLD) is a gentle, specialised technique that stimulates the lymphatic system to clear excess fluid, reduce swelling, and assist with the healing process. After surgery, your lymphatic system could be damaged and can struggle to keep up with its work, and that’s where MLD makes a big difference. Indeed, the stimulation of the Lymphatic System, via MLD therapy, can help in assisting your recovery and ensure that the fibrotic tissue gets absorbed and dismissed, restoring freedom of movement and leaving you soon after treatment in a deep relaxation state. I trained in the MLD with the Vodder style; therefore, I can provide precise, tailored treatments that are safe for sensitive post-operative tissue. Book your post-surgery lymphatic drainage in Coburg today to safely reduce fibrosis. When can I start MLD treatment post-cosmetic surgery? Generally, MLD is safe to start as soon as the antibiotic cycle is completed post-cosmetic surgery. Given the light touch of this type of therapy, we aim to cause no pain during the treatment, so we can work close to the surgical site without affecting the recovery process. On the other hand, I found myself occasionally referring patients to the local nurse or GP, as their recovery immediately post-surgery was compromised by misleading suggestions and procedures offered by overseas cosmetic surgery clinics. If you are not sure about what’s going on with your recovery, please, before placing a booking for an MLD treatment, talk to your GP about your recovery state, and if you have any questions regarding MLD treatment, you can always reach out to me via the contact page. How Many MLD Sessions Do I Need To Reduce The Fibrosis? As mentioned earlier, everyone responds differently to cosmetic surgery, but in my experience, it would take at least 4 to 6 weeks to start seeing a significant difference in fibrous tissue presence. That said, the number of sessions and the length of the sessions can vary based on the area where you received the surgery. Abdominal surgery only: I will recommend 2 to 3 treatment per week for the first 3 weeks. Within the first week, we may spend 1 hour per session, and from the 2nd week onwards, we reduce the treatment to 45 minutes. Multiple liposuction sites: as there are multiple areas where you received surgery, we may need to extend the time of treatment up to 1 and a half hours initially, or go for multiple sessions, each for a different area. The first few treatment may take longer, as we want to spend some extra time trying to break down the fibrosis with a gentler touch, due to the high sensitivity of the body, which is high due to post-surgery. As the sensitivity decreases and we can apply further pressure, we can achieve the same result in fibrosis reduction in less time. If you are not sure what works best for you, you can book a 15-minute free online consultation, so we can discuss your needs and work out a treatment plan in accordance with them. MLD Prices in Coburg All my services are offered at the same rate and are as follows: 90 mins – $175 1 hour – $125 45 mins – $ 115 30 mins – $90 All those prices are inclusive of GST. The 90-minute option is available only if required and not via the booking system. Why Choose MLD at Melbourne Massage and Treatment in Coburg? Not all lymphatic massage techniques are safe after surgery. I have been working with MLD since November 2021, and […]
Sep
A pain response is a signal created by the brain to let you know that something within the body is not right, or at least that something, potentially, is not right. This means that pain is a sensation that can also be there when no actual damage is present in the first place. But when you feel pain in the neck, in the shoulder, in the knee or somewhere, how can you differentiate whether it is pain caused by muscles or by a joint? In this blog, I want to talk about the difference between muscle pain and joint pain. Muscle and Joint Pain: Let’s Start With Clinical History Intake When someone presents to the clinic in pain, the first thing I do is to track down their medical history, which includes their daily activities, previous injuries (old and recent), sports history, medications, quality of sleep, etc.. From there, I start to narrow down when they have been experiencing the pain, and what caused it in the first place, and where they feel it. Already, that information can give a good perspective of what we are looking at, in terms of muscle pain and joint pain. Knowing the time frame of the pain and the location of the pain can already give an answer. But before jumping to conclusions, we need to do some testing Active and Passive Movement: The Differences In Pain Response After an accurate intake of the clinical history, we would proceed with some testing, including active and passive range of motions. Active range of motion (AROM) are those movements that the patient would do on their own, like flexing the shoulder, rotating the hip, etc Passive range of motions (PROM), on the other hand, are movements that the therapist would do with the patient’s body. So you will be asked to keep your arm and shoulder relaxed, and it will be the therapist who moves the arm. Here is where things start to get interesting. If you respond with pain with AROM, we know that you are using both your muscle and joint to deliver the movement, so the pain response that you feel could be either from the muscle or the joint. But if you respond with pain with a PROM, then we know that the response is from the joint, because the muscle, in that specific motion, is not working. How about tendon? So, when delivering a PROM, we may push the movement to its limit, creating a stretch motion. This specific endpoint of movement, if it reproduces a really pinpoint-specific pain that is sitting right on what we can recall as a tendon (the insertion point of the muscle), is another differential tool to understand what the pain is caused by. So yes, to simplify, we use PROM to identify joint pain, but in that joint pain, we include the tendon itself, not only the ligaments. Ligaments, for clarification, are the tissues that hold the bones together and make up the joint. Orthopedic testing: another tool for differentiating muscle pain from joint pain But the rabbit hole of understanding where that pain is from doesn’t stop here. That’s why we also use orthopedic testing when looking at a pain presentation. Ortopedic testing is a test that places stress on a specific structure, and can have a range of sensitivity and specificity. Sensitivity refers to the test’s ability to identify individuals who have the condition being tested for. Specificity refers to its ability to identify individuals who do not have the condition. Those two terms, that get evaluated in %, can tell us how valuable a test is. And most often, to validate a hypothesis of what can cause the pain, we have to use multiple forms of testing, from AROM to PROM to orthopedic testing and Clinical History. Neck Pain: Muscle Pain or Joint Pain – A case study Neck or upper shoulder pain is one of those common presentations, where the patient presents thinking that it is due to a muscle issue, but then you prove to them that it is actually their joint that is the issue. Who is Peter, and with what pain does he present himself? Let’s examine a case study of Peter (name of fantasy), a 43-year-old office worker presenting with pain radiating from his right neck to the upper shoulder. Despite various stretches, the pain persists. He tried many pillows; he tried any sleep position, but this pain comes and goes and has been on for years. Peter presents with a pain level today of 7/10, complaining that certain neck movements are limited and painful. It is hard, for example, to do a head check while driving. Clinical History So, the first thing I would do is go through Peter’s clinical history and find out that his pain started about 10 years ago, after a whiplash accident, and that at that time, other than having a collar on his neck for a week or two, he hadn’t done much about it. Hi pain, which occasionally radiates to the neck, also gives him a headache. Sport history includes playing AFL from when he was a kid till his mid-twenties, and nowadays the occasional swim, yoga and pilates class. He spends most of his days working from home or at the office, sitting in a chair. In addition to this, we also know that: No pain radiating down the arms, no pins and needles in the hands; Pain is worst in the morning; Stretching gives an initial relief, but then it gets worse. Differential Diagnoses (DD) Differential diagnoses are the hypotheses we think of when someone presents with pain. Let’s say that is what we think we could find as a problem, given the patient’s complaint we received. And out of 3 or 4 DD’s, we will draw a line that connects all the results and get a Working Diagnosis (WD), which is the most plausible answer given the results we obtained. This said, this is not an […]

Aug
Modern life places ongoing pressure on both body and mind, leaving many Australians searching for natural ways to restore calm. Muscle tightness, fatigue, and poor sleep are often signs that stress has taken hold. At Melbourne Massage and Treatment, remedial massage is used as a practical therapy to release tension, regulate the nervous system, and support wellbeing, offering a balanced pathway to sustained relaxation and resilience. Key Takeaways Stress affects both body and mind Remedial massage releases tension and restores balance Circulation and sleep improve with regular sessions The nervous system resets during treatment Melbourne Massage and Treatment offers expert support What is Remedial Massage? Remedial massage is a form of therapeutic massage that targets specific muscles and tissues to relieve pain, promote healing, and improve function. It combines various techniques, including deep tissue work, trigger point therapy, myofascial release, and stretching, to address both acute and chronic conditions. Unlike relaxation massage, which focuses on general relaxation, remedial massage is tailored to treat specific problems in the body, such as muscular tension, joint pain, and postural imbalances. The key difference between remedial and other types of massage is that it aims to treat underlying physical issues and dysfunctions, which can, in turn, help to alleviate the mental and emotional effects of stress. Stress can manifest physically in the body in various ways, including muscle tension, headaches, poor posture, and fatigue. Remedial massage directly addresses these physical symptoms, creating a ripple effect that helps to calm the mind and restore balance. How Remedial Massage Reduces Stress? Stress doesn’t just impact your mind; it can manifest physically in the body, resulting in tight muscles, headaches, neck pain, back discomfort, and other ailments. When the body is under stress, it produces higher levels of cortisol harmone, a hormone linked to the body’s “fight or flight” response. This can lead to increased muscle tension, heart rate, and even digestive issues. Remedial massage works by targeting these physical manifestations of stress and promoting relaxation in several ways. 1. Reduces Muscle Tension One of the most immediate and noticeable benefits of remedial massage is its ability to reduce muscle tension. When we experience stress, we often unconsciously tighten our muscles, especially in areas like the neck, shoulders, back, and jaw. Over time, this chronic muscle tightness can lead to pain, discomfort, and restricted movement. Remedial massage helps to release this built-up tension by applying pressure to specific muscle groups, promoting blood flow, and encouraging the muscles to relax. Targeted Techniques: Techniques such as deep tissue massage and trigger point therapy can focus on areas where muscle tightness tends to accumulate due to stress. These methods help to break up muscle knots and reduce the overall tension in the body. Increased Blood Flow: By improving circulation, remedial massage enhances the delivery of oxygen and nutrients to tissues, promoting healing and relaxation. 2. Activates the Parasympathetic Nervous System The autonomic nervous system consists of two branches: the sympathetic nervous system (SNS), which triggers the ‘fight or flight’ response, and the parasympathetic nervous system (PNS), which manages the ‘rest and digest’ state. Chronic stress keeps the SNS activated, which can leave the body in a constant state of alertness. Remedial massage stimulates the PNS, encouraging the body to relax and return to a state of calm. Relaxation Response: When the PNS is activated, heart rate and blood pressure drop, and the body enters a state of relaxation. This not only helps with muscle relaxation but also reduces anxiety and promotes overall mental well-being. Lowering Cortisol Levels: By activating the PNS, remedial massage helps to lower cortisol levels in the body. This reduction in cortisol can help combat the harmful effects of prolonged stress, such as anxiety, poor sleep, and immune system suppression. 3. Improves Sleep Quality Stress often leads to poor sleep, whether through difficulty falling asleep or waking up throughout the night. One of the ways that remedial massage helps to combat stress is by promoting better sleep. Through its calming effects on the nervous system and muscle relaxation, massage encourages a deeper, more restful sleep. Relaxation Before Bed: A remedial massage session before bed can help you unwind from the day’s stress, allowing you to go to sleep feeling relaxed and at ease. Improved Sleep Cycle: By reducing tension and lowering cortisol levels, remedial massage helps to improve the quality of sleep, leading to more restorative rest and reduced feelings of stress the following day. 4. Reduces Anxiety and Enhances Mood Stress and anxiety often go hand in hand. While stress tends to be a response to external pressures, anxiety can become a persistent feeling that affects your mental health. Remedial massage has been shown to have a positive impact on mental health, particularly by reducing anxiety and boosting mood. Endorphin Release: Massage stimulates the release of endorphins, natural chemicals in the brain that promote feelings of well-being and happiness. This helps to counteract the negative effects of stress and anxiety, providing a natural mood lift. Emotional Release: For some individuals, massage can facilitate an emotional release, allowing pent-up emotions from stress to surface. This can be therapeutic and contribute to a feeling of emotional lightness and mental clarity. 5. Improves Posture and Reduces Pain Chronic stress can lead to poor posture, which, in turn, can contribute to musculoskeletal pain. When we’re stressed, we tend to slouch or hunch over, especially when working at a desk for long periods. This poor posture can lead to discomfort in the back, shoulders, and neck, further exacerbating stress. Remedial massage works by improving posture and reducing musculoskeletal pain. Postural Correction: Remedial massage helps to release tight muscles and realign the body, improving posture and reducing the discomfort associated with poor alignment. Pain Relief: By targeting specific areas of pain, remedial massage can relieve discomfort in muscles, joints, and connective tissue, contributing to an overall sense of well-being. Additional Benefits of Remedial Massage for Stress Relief In addition to the direct effects on the body and mind, remedial massage offers […]

Aug
Thai yoga combines assisted stretching with mindful breathing to restore mobility, release tension, and create deep relaxation. At Melbourne Massage and Treatment, this approach blends traditional techniques with professional care, allowing clients to experience greater freedom of movement and a calmer state of mind. With its unique mix of yoga-inspired postures and therapeutic massage, Thai yoga holistically supports both body and mind. Key Takeaways Thai yoga blends stretching, mobility, and relaxation It improves flexibility and posture Stress relief is a core benefit Sessions are fully guided and accessible to all Melbourne Massage and Treatment tailors each session to your needs What is Thai Yoga? Thai Yoga, also known as Thai yoga massage or Thai bodywork, is a traditional healing practice that originated in Thailand over 2,500 years ago. It combines elements of: Yoga-style stretching Acupressure Mindful breathing Meditative touch Unlike a regular massage or a typical yoga class, Thai Yoga is a partner-based practice. The practitioner gently guides you through yoga-like stretches and poses while applying pressure to specific points along the body’s energy lines, known in Thai tradition as Sen lines. The result is a deeply restorative experience that helps release tension, increase range of motion, and calm the nervous system, all without you having to lift a finger. At Melbourne Massage and Treatment, Thai yoga is offered as part of a tailored approach to mobility, posture, and recovery. Mobility: Loosening Up the Joints and Muscles One of the biggest benefits of Thai Yoga is improved mobility. Many of us deal with tight hips, sore backs, or stiff shoulders, whether from sitting all day, overtraining, or simply getting older. Thai Yoga works to gently open up these areas by: Stretching muscles in a passive and supported way Mobilising joints through guided movement Increasing circulation and blood flow to tight or stagnant areas This kind of assisted stretching helps lengthen muscles and fascia (the connective tissue that surrounds your muscles), which improves flexibility and reduces the risk of injury. And because you’re not doing the work yourself, your body can fully relax into each movement, allowing for a deeper and safer stretch than you might achieve on your own. Relaxation: More Than Just Taking It Easy Sure, we all love a good nap or a lie-down on the couch. But true relaxation goes deeper than just stopping activity, it’s about letting the body and mind fully switch off, so healing and recovery can happen. Thai Yoga encourages this state of deep rest through: Rhythmic, flowing movements that calm the nervous system Mindful breathing to slow the heart rate and promote stillness Gentle compression and touch that creates a sense of grounding and safety After a session, many people report feeling lighter, looser, and mentally clearer. Some describe it as a moving meditation or a “body reset.” If you’ve been feeling strung out, overwhelmed, or physically tight, Thai Yoga might be the reset button you didn’t know you needed. Who Can Benefit from Thai Yoga? Thai Yoga is suitable for a wide range of people, including: Office workers who sit for long hours and need to improve posture and mobility Athletes or gym-goers looking to aid recovery and reduce tightness Older adults want gentle movement and joint support People dealing with stress, anxiety, or sleep issues Anyone wanting to improve flexibility, body awareness, or simply relax The best part? You don’t need any yoga experience. Thai Yoga is fully guided, and each session can be adapted to suit your body, flexibility, and needs on the day. What Happens in a Thai Yoga Session? Here’s what you can expect during a typical Thai Yoga session: You stay fully clothed in comfortable attire (like gym or yoga wear) The session takes place on a mat on the floor, not a massage table The practitioner uses their hands, thumbs, elbows, knees, or feet to stretch, rock, and apply pressure Sessions can last anywhere from 60 to 90 minutes The experience is quiet, meditative, and deeply calming You’ll be gently moved through a series of postures, from seated twists to spinal stretches, hip openers, and shoulder releases, all while lying down and breathing deeply. For those seeking greater depth, advanced thai yoga practices may also be introduced, incorporating more complex stretches, dynamic flows, and breathwork techniques to further enhance mobility and relaxation. Thai Yoga vs. Traditional Yoga: What’s the Difference? While both practices aim to support flexibility, relaxation, and body awareness, the key difference is that Thai Yoga is done to you, not by you. Traditional yoga involves actively moving into and holding poses, while Thai Yoga is a passive, assisted experience. This makes it ideal for people who: Are you new to yoga or struggle with certain movements Are you recovering from an injury or managing chronic conditions? Prefer a more hands-on approach to bodywork and healing In many ways, Thai Yoga bridges the gap between yoga and massage, offering the best of both worlds. Bringing Thai Yoga into Your Life You don’t have to travel to Thailand to reap the benefits. Thai yoga practitioners are available in cities and regional areas across Australia. Many yoga studios, wellness centres, and massage therapists now offer Thai yoga classes as part of their services. If you’re interested in giving it a go, here are some tips: Look for a certified Thai Yoga practitioner with experience and good reviews Wear loose, comfy clothing (like leggings and a tee) Stay hydrated before and after your session Speak up during the session if any movement feels uncomfortable Approach it with an open mind and no expectations, every session is different Conclusion Thai yoga is more than stretching, it is a practice that restores balance, enhances movement, and promotes deep relaxation. Combining mindful breathing with guided mobility creates space for the body to release tension and recover naturally. Ready to experience the benefits for yourself? Contact us today and book a session designed to improve both mobility and relaxation. FAQ

Aug
As a Lymphoedema therapist, I often get asked what the difference is between Lymphoedema and Lipedema. In this blog, we will explore the differences, the similarities, and what can be done for prevention, management and treatment of those presentations. Furthermore, we will look into how Lipoedema can degenerate into a Lipo-Lymphoedema, and why this is not the case for everyone. What is Lipoedema? Lipoedema is a chronic adipose tissue disorder that primarily affects women. On a global scale, we know that about 11% of women are affected by this presentation, and it often runs in families as it has a strong genetic component. The major characteristics of Lipoedema are an abnormal and symmetrical accumulation of fat around the hips, buttocks, thighs, and legs, and upper arms. On the leg area, the fat appears in abundance in the medial side of the knee, too. Where feet are completely untouched by the fat accumulation, this fat is resistant to diet and exercise and is often painful to touch. The pain is due to the cutaneous nerve entrapped in the fatty tissue, and so delivers a pain response when stimulated. Other Lipoedema key features: Often triggered or worsened by hormonal changes Symmetrical fat distribution Soft, nodular, or lumpy tissue Pain and easy bruising – as per the pain, bruising is due to blood capillary compression from the fat, and so, is easily damaged by touch No skin thickening or pitting in the early stages Nowadays, there is increasing awareness about this presentation, and more and more women find benefit from a management protocol that is not only about cardio and exercise. Part of the Lipoedema management includes: Movement Compression stocking Antiinflammatory diet Skin care Where and if needed, cosmetic surgery intervantion What is Lymphoedema? Lymphoedema, on the other hand, is a condition where lymphatic fluid builds up in the tissues due to a malfunctioning lymphatic system, causing chronic swelling. Compared to Lipoedema, Lymphoedema is strictly related to the Lymphatic system. It can be primary (congenital or hereditary) or secondary (due to trauma, surgery, radiation, or infection affecting the lymphatic system). Lymphoedema characteristics: Unilateral or asymmetrical swelling (though it can be bilateral) Pitting edema – It consists of deep indentation (pitting) left behind on the skin when pressure is applied Skin changes over time (fibrosis, hyperkeratosis, papillomatosis) Affects feet and hands as well – primary lymphedema would start from the extremity Heaviness or tightness in the affected area – can potentially be pain-free, but the limb/s may feel very heavy It does affect men and women – only primary lymphedema has a genetic component Lymphoedema Management The management of Lymphoedema is more tricky than lipoedema, as everyone may react differently to the management, it can be related to other health issue which needs to be considered, and requires the patient to be active in the management side of things. At Melbourne Massage and Treatment, I treat different types of lymphedema, as per the upper and lower body, focusing on an initial reduction of the swelling via a combination of Manual Lymphatic Drainage (MLD) and compression with Combined Decongestive Therapy (CDT). The management of this presentation can take anywhere between 3 and 5 or more appointments, depending on the severity of the presentation. The treatments are better done in close proximity, 24 to 48 hours one after the other, so that we give no time to the body to accumulate fluid back under the skin. Once the combination of treatment allows us to achieve the desired result, which is bringing the limb/s to a thinner size, you will be scheduled for a custom garment wear compression, which will guarantee to maintain the results achieved. This is usually done at other clinics, like Sigvaris or Juzo clinics. Those clinics are specialised in the making of garment wear. Custom garments wear last about 6 months, so twice a year, you will need to change them, and if needed, because the limb/s may start swelling again (especially in summer, when there is a change of atmospheric pressure, due to the heat), a short series of MLD and CDT therapy may be needed. Key Differences between Lymphoedema and Lipoedema Feature Lipedema Lymphoedema Cause Abnormal fat metabolism Lymphatic dysfunction Gender prevalence Almost exclusively women Affects both sexes Onset Often at puberty, pregnancy, or menopause Can be congenital or triggered by injury/surgery Distribution Symmetrical, lower limbs and arms Can be asymmetrical; any body part Feet/Hands Spared Usually involved Pain Tender, painful fat Often painless, heavy feeling Skin texture Soft, nodular fat Skin thickens over time (fibrosis) Pitting Rare (early) Common (early) Response to elevation Minimal improvement Often improves with elevation (if early stage) Bruising Common Not typical Common Characteristics of Lymphoedema and Lipoedema As seen above, the characteristics of Lipoedema and Lymphoedema are different, but, both conditions share chronic swelling, potential functional limitations, and a need for long-term management: Both can cause leg discomfort, heaviness, and swelling Both may lead to reduced mobility Neither condition improves with calorie restriction or exercise alone – it is more about stop the intake of inflammatory food Compression therapy is often used for both Both can have a progressive nature if not managed properly – especially lymphoedema Misdiagnosis is common, often delaying effective treatment When Lipedema Becomes Lipo-Lymphoedema If we stick to a vision of Lipoedema progression, that is possible when no management is put in place, this presentation can degenerate into secondary lymphatic impairment, resulting in a combined condition known as Lipo-Lymphoedema. How this happens: As the fat keeps accumulating under the skin, and there is an increase in inflammation, the lymphatic vessels are put under major load and potential damage Over time, this leads to fluid retention and swelling due to the lymphatic system failing to do its job As the lymphatic system becomes overwhelmed, the person may start experiencing lymphedema symptoms (Example: swelling in the extremities, feet and or hands) Patients now experience both fat deposition and fluid buildup, making treatment more complex Signs that Lipedema has progressed: Swelling starts in the feet […]

Aug
When patients are seeking Lymphoedema treatment, they often ask if a GP referral is needed to start the treatment. The short answer is no, you don’t need a GP referral to come to Melbourne Massage and Treatment, but other practices may ask for it. I do understand that Lymphoedema can cause discomfort, swelling, and affect your quality of life, so I want to make it as simple as possible for you to access care. That’s why I offer a free 15-minute online consultation, where you can ask me questions about how we are going to work on your lymphedema, and where I can start to get a better picture of your clinical history. What I Require Before Your First Visit As already mentioned, no GP referral is needed, but before we commence any treatment, I will ask you to fill in an Initial Consultation Form. On this form, you will be asked to: Declare any present health conditions List any previous injuries, surgeries, or illnesses Note any medications you are taking Share any relevant lifestyle information that may impact your treatment A series of questions specific to your lymphedema presentation, such as mobility impairments or pain level, if any This ensures I have a thorough understanding of your current health and medical history so that I can tailor your treatment safely and effectively. This also allows me to understand the nature of your Lymphoedema, whether primary or secondary, and determine if there is a need to discuss other medical conditions with your GP or other health practitioners. Why No GP Referral? As a Clinical Myotherapist in Australia, I can offer lymphedema treatment without needing a GP referral to start with. On the other hand, since the Medicare plan does not yet cover Myotherapy (blame the politicians for it), I can’t offer a Medicare rebate for this type of service. But, if you are on NDIS as a non-registered provider, I can provide treatment for self-managed or plan-managed NDIS participants. Private Health Rebate for Lymphoedema Therapy As mentioned above, a Medicare rebate is not available at Melbourne Massage and Treatment, but private health rebates are. Indeed, Manual Lymphatic Drainage, that is the hands-on treatment I offer as a myotherapist to treat a lymphedema presentation, is covered under the scheme Myotherapy and Remedial Massage. The rebate percentage is based on the insurance contract you signed. And yes, you can do the claim on the spot here at the clinic, at the end of the session, once we go through the payment. Lymphoedema Therapy Cost at Melbourne Massage and Treatment Given the usage of bandaging during the lymphedema therapy, the cost of this treatment is higher than that of other services. The bandaging, indeed, is used after the Lymphatic Massage, to compress the limb/s to maintain pressure on them and move the liquid while you are in movement or at rest. As of August 2025, the cost of lymphedema therapy at Melbourne Massage and Treatment is as follows: Consultation Price 15-Minute Online Consultation FREE Initial Consultation – 90 minutes $ 190 Inc. GST Returning $ 145 Inc. GST To successfully reduce swelling and alleviate the symptoms of Lymphoedema, a series of sessions is typically required, ranging from 3 to 5 sessions, depending on your presentation. It is not always possible to estimate the exact number of sessions to start with, as the limb reduction also depends on your clinical history, medications, exercise habits, food intake, appointment frequency and more. Lymphoedema Appointment Frequency The appointment frequency when treating a Lymphoedema presentation is a crucial aspect of treatment success. This is because the lymphedema is there in the first place due to the lymphatic system being inefficient, and to ensure that we overcome this inefficiency, we have to stimulate the lymphatic system as often and frequently as possible. Ideally, treatment should be done every 24 to 48 hours. This requires time management and commitment from the patient, which I do understand is a challenge. But consider this appointment frequency to be the central pillar of lymphedema management. The more frequently we stimulate the lymphatic system and the more frequently we work on breaking down the fibrosis (which may have been building up below the skin), the quicker we can achieve the desired results, and the less likely you are to encounter complications. When we talk of complications, we refer to: Fibrosis builds up Skin craking Infections due to skin damage Reduced mobility and more… Get in touch now – No GP Referral Needed To start your recovery, book a 15-minute online consultation, fill in the forms, and let’s take it from there. Or if you have any questions that you prefer to address via email, just get in touch via the contact page. Furthermore, for those who have gone through cancer surgery or may suffer from secondary lymphoedema on the Lymphoedema service page, you will find a questionnaire for Arm Lymphoedema and Leg Lymphoedema, which can help us understand the likelihood of lymphoedema development. In addition to the questionnaire, going for a pre-appointment free consultation can also save us time to understand if there are any other conditions or contraindications about Lymphoedema that may need to be addressed first. Lymphoedema Treatment Contraindications – That’s where a GP referral could come through. Other medical conditions could be present while someone is suffering from Lymphoedema, and those conditions may be an absolute or partial contraindication to Lymphatic drainage. Lymphoedema absolute contraindications may be: History of heart failure Liver and or Kidney fatigue Untreated cancer Active infections History of DVT Lymphoedema relative contraindications may be: Asthma Open wound Pregnancy (present, not past)

Aug
When we think of losing fat, the first action we picture in our head is to start running, walking, swimming or any form of cardio training. But is that actually the best fat loss solution? In this blog, we are going to look into why cardiovascular exercise has many benefits, but when it comes to losing fat mass effectively and sustainably, lifting weights deserves the spotlight. For fat loss, total body weight should not be your target: Focus on Body Composition Another go-to habit, when we focus on losing weight, is to check with a scale where we are at. But the reality of the fact is not as simple. When using a regular scale, you are looking at the total mass of your body, which includes not only your fat, but also your muscle mass, bone mass, etc… Indeed, losing weight isn’t the same as fat loss. Therefore, you should know that when you restrict calories, up to 50% of the weight you lose may come from muscle, not fat–unless you intentionally preserve it through strength training. Muscle is essential for more than movement – it’s a metabolically active tissue. That means it burns more calories at rest than fat. The more muscle you have, the higher your basal metabolic rate (BMR), making it easier to maintain fat loss long-term. Muscles Are Our Metabolic Engine When talking about muscles, we need to change the perspective on their functionality. The locomotive aspect of muscles, which means the ability of the muscles to move the skeletal system, is just one aspect of them, but not the only one. Therefore, when thinking about muscles, start considering that they are also glucose-hungry machines; indeed, they pull sugar out of the bloodstream and help convert it into usable energy. This process is critical for managing blood sugar and inflammation, which are two major drivers of fat storage and chronic disease. So to simplify it, less muscle mass means less body efficiency at using energy, therefore becoming more prone to storing excess calories as fat. Behind this mechanism lies the reason why losing weight without building muscle mass is not a long-term solution, as you will gain weight back. The Double Side of Cardio (When done on its own) When trying to lose weight, it becomes a combination of cardio and less energy intake (a certain type of diet), and to it you add the fact that muscles are not loaded, and by loaded I mean put under strength activities, it becomes easier to lose muscle mass. This happens because the body goes into a calorie deficit, and in order to keep functioning, it is going to take energy off the muscles themselves, reducing their size. This is an extra reason to ensure you are loading those muscles, to ensure the energy to burn is taken from fatty tissue. All of this does end up with yes, a weight loss, but also weakens the very system that helps keep fat off. It’s Never Too Late – Muscle Responds at Any Age This is a topic that we have seen in other blogs, and it is time to remember that age is only a perspective and not a mandatory fail. The body is designed to respond to stimulus, and get stronger and stronger under new and constant stimulus; it doesn’t matter the age. In fact, even older adults, including those in their 60s, 70s, and 80s, can gain strength and improve body composition with the right program. Muscle stem cells (satellite cells) remain responsive well into late adulthood. You don’t need to be a lifelong athlete – many people start lifting in midlife and see dramatic improvements in energy, mobility, and fat loss. How to Lift for Fat Loss As per all the forms of training, there are certain aspects that need to be respected to achieve the desired goal. For fat loss, then, you may want to look into: Focus on compound lifts such as Squats, deadlifts, bench press, and rows, so that you work multiple muscles and burn more calories. Train to near failure, which means from 4 heavy reps or 10 moderate ones, but with progressive overload. Lift 3–5 times per week as consistency beats intensity. And if a week you can do less, it’s ok, don’t be hard on yourself. Look into your eating habits, talk to your local GP about your eating habits and see if you need a referral to a specialist for improving your food habits. Add sprint intervals twice weekly: Brief, high-intensity cardio can enhance fat burning and insulin sensitivity without causing muscle loss. Fitness Class at Melbourne Massage and Treatment At Melbourne Massage and Treatment, in Coburg, I got the skills and the equipment needed to help you achieve your goal, but also, help you learning how to deliver safe exercises for your wellbeing and your athletic preparation. Indeed, when talking about lifting weights, we always want to look at first where your training level is, what your abilities are, and with no judgment, take the first step from there and help you to achieve your short-term and long-term goals. If you are keen to learn more and want to have a chat about your goals, book a 15-minute free online consultation now, so that we can discuss how I can help you and where we can get you with your exercise routine. In Conclusion: Lift First, Then Move More In this blog, we emphasised how strength training is ideal for fat loss, and what we want to tell you with this is that cardio has a place for heart health and endurance, but it’s not the most effective path to long-term fat loss. Prioritising strength training, especially as you age, helps preserve muscle, boost your metabolism, and shift your body into a fat-burning machine. And most importantly, let’s stop chasing a number on the scale. Instead, start chasing strength, power, and metabolic resilience.

Jul
The term “inflammation” originates from the Latin word “inflammare”, meaning “to set on fire” or “to ignite”. And this is why it may sound scary, and sounds like a bad thing to go through, but in the initial phase of an injury, the inflammation is actually a necessary part of healing. Indeed, this initial step is how your body signals that something is wrong and starts the repair process. On the other hand, if the injury is not looked after, especially when we talk about major injury, the inflammatory process can become problematic. In this blog, we are going to look into what the steps are to take when going through an injury, which can be a sprained ankle, recovering from surgery, or managing chronic pain, in order to have the best recovery. The 0–72 Hour Rule: Respect the Acute Phase When going through the initial phase of an inflammation, which is the first 72 hours post-injury, the body enters the acute inflammatory phase, and this is absolutely normal and necessary for the body to start taking action towards safe healing. In this process, the immune system rushes white blood cells and inflammatory mediators to the area to begin cleanup and repair. Things to avoid: Avoid anti-inflammatories (NSAIDs or corticosteroids): As this process is needed from the body to understand what has happened and to clear up the area from eventual pathogens, taking something that suppresses the process is not ideal. Avoid ice: Ice is a vessel restrictor, which means it would slow the amount of blood that is sent to the area. Yes, it may reduce the swelling, but that swelling is innoquos compare to the consequence of not having blood rushing to the area with the nutrience and substance needed to start the healing process. Things you can do: Protect and rest the area. Avoid using the injured area and place weight on it. Rest it and where possible do really some minimal movement that may not cause pain or disconfort. Compression and elevation help reduce fluid buildup. If your goal is to reduce swelling, you can apply compression and keep the area elevated. After 72 Hours: Shift to Recovery Support Past the first 72 hours, the inflammatory response was meant to be settled. If that’s not the case, that’s when it ok to take anti-inflammatories. That would help manage the pain in the long term and allow you to start moving freely. That said, before you take any medication, always consult your GP or pharmacist. Moving forward, this second phase of the injury recovery is called remodelling and repair. In this phase, it is the time to: Introduce gentle movement and rehabilitation exercises – most often isometric hold, which we spoke about in another blog. Use anti-inflammatory agents (if needed) under professional guidance. Massage therapy and heat packs become helpful — they promote circulation, lymphatic drainage, and tissue flexibility. While the remodelling and repair phase starts past the 72h post injury, the recovery itself may last weeks or months, depends on the type of injury. For more details about the healing process of different tissues, read this blog. What Are The Symptoms of Inflammation Post-Injury You may notice that soon after an injury the body has a really specific way to respond to what just happened. This response include: Swelling – more blood is sent to the area; Skin redness Pain to touch or movement Those are some of the visible or more noticeable aspects of an inflammatory response post injury, but on the macroscopic level, there is more happening, such as the rush of white cells to the injured area, and the increase of blood clotting cells, if the skin is cracked. Food, Fats, and Chronic Inflammation: The Lymphatic Link An inflammation is not a process that comes only from an injury. The food and drinks that we intake are a significant source of chronic, low-grade inflammation, especially when they include excessive amounts of long-chain fatty acids found in ultra-processed foods, deep-fried items, and fast food. Given the chemical structure of those fats, which are made from a chain of 16 carbon atoms (therefore long-chain), they can be absorbed directly by the capillary of the bloodstream, due to the narrow passage at the capillary end. Indeed, those fats would get absorbed by the lymphatic system, which capillaries have a wider aperture. That said, once the fat is travelling along the lymphatic system, it would be recognised as an external element and attacked by immune cells such as macrophages, and this is an inflammatory response. Now, when the lymphatic system becomes overburdened with inflammatory fats, it can lead to chronic inflammation. This is also why some people feel bloated, puffy, or in pain even without any injury. This also explains why, when seeing people with Lymphoedema, we refer them to a GP to discuss an anti-inflammatory diet. Given the excess load of the lymphatic system along this presentation, it is better not aggravating it. And to loop back on the topic of this blog, even when you hurt yourself badly with a major injury, or you may be suffering from chronic pain, a balanced diet rich in veggies and fruit, grain and fresh food, is recommended over junk food and inflammatory meals. Top Pro-Inflammatory Foods to Watch Out For: Highly refined vegetable oils Fried foods High-sugar snacks and drinks Ultra-Processed meats How Massage Therapy Helps (and Why Sometimes Hurts) Many forms of massage, especially those where you may experience discomfort and pain, like Remedial Massage or Thai Massage, or even technique like Dry Needling, aim to reproduce microinflammatory response, and that’s why they are effective in helping you with recovery. Indeed, that pain response, is an alarm for your nervous system, which is pushed to send nutrience to the area affected by the pain. Now, what is important is to understand the time frame of healing, the subjective history of the patient we are working with and the level of injury they are presenting with. Massage helps by: […]