
The term “inflammation” originates from the Latin word “inflammare”, meaning “to set on fire” or “to ignite”. And this is why it may sound scary, and sounds like a bad thing to go through, but in the initial phase of an injury, the inflammation is actually a necessary part of healing. Indeed, this initial step is how your body signals that something is wrong and starts the repair process. On the other hand, if the injury is not looked after, especially when we talk about major injury, the inflammatory process can become problematic. In this blog, we are going to look into what the steps are to take when going through an injury, which can be a sprained ankle, recovering from surgery, or managing chronic pain, in order to have the best recovery. The 0–72 Hour Rule: Respect the Acute Phase When going through the initial phase of an inflammation, which is the first 72 hours post-injury, the body enters the acute inflammatory phase, and this is absolutely normal and necessary for the body to start taking action towards safe healing. In this process, the immune system rushes white blood cells and inflammatory mediators to the area to begin cleanup and repair. Things to avoid: Avoid anti-inflammatories (NSAIDs or corticosteroids): As this process is needed from the body to understand what has happened and to clear up the area from eventual pathogens, taking something that suppresses the process is not ideal. Avoid ice: Ice is a vessel restrictor, which means it would slow the amount of blood that is sent to the area. Yes, it may reduce the swelling, but that swelling is innoquos compare to the consequence of not having blood rushing to the area with the nutrience and substance needed to start the healing process. Things you can do: Protect and rest the area. Avoid using the injured area and place weight on it. Rest it and where possible do really some minimal movement that may not cause pain or disconfort. Compression and elevation help reduce fluid buildup. If your goal is to reduce swelling, you can apply compression and keep the area elevated. After 72 Hours: Shift to Recovery Support Past the first 72 hours, the inflammatory response was meant to be settled. If that’s not the case, that’s when it ok to take anti-inflammatories. That would help manage the pain in the long term and allow you to start moving freely. That said, before you take any medication, always consult your GP or pharmacist. Moving forward, this second phase of the injury recovery is called remodelling and repair. In this phase, it is the time to: Introduce gentle movement and rehabilitation exercises – most often isometric hold, which we spoke about in another blog. Use anti-inflammatory agents (if needed) under professional guidance. Massage therapy and heat packs become helpful — they promote circulation, lymphatic drainage, and tissue flexibility. While the remodelling and repair phase starts past the 72h post injury, the recovery itself may last weeks or months, depends on the type of injury. For more details about the healing process of different tissues, read this blog. What Are The Symptoms of Inflammation Post-Injury You may notice that soon after an injury the body has a really specific way to respond to what just happened. This response include: Swelling – more blood is sent to the area; Skin redness Pain to touch or movement Those are some of the visible or more noticeable aspects of an inflammatory response post injury, but on the macroscopic level, there is more happening, such as the rush of white cells to the injured area, and the increase of blood clotting cells, if the skin is cracked. Food, Fats, and Chronic Inflammation: The Lymphatic Link An inflammation is not a process that comes only from an injury. The food and drinks that we intake are a significant source of chronic, low-grade inflammation, especially when they include excessive amounts of long-chain fatty acids found in ultra-processed foods, deep-fried items, and fast food. Given the chemical structure of those fats, which are made from a chain of 16 carbon atoms (therefore long-chain), they can be absorbed directly by the capillary of the bloodstream, due to the narrow passage at the capillary end. Indeed, those fats would get absorbed by the lymphatic system, which capillaries have a wider aperture. That said, once the fat is travelling along the lymphatic system, it would be recognised as an external element and attacked by immune cells such as macrophages, and this is an inflammatory response. Now, when the lymphatic system becomes overburdened with inflammatory fats, it can lead to chronic inflammation. This is also why some people feel bloated, puffy, or in pain even without any injury. This also explains why, when seeing people with Lymphoedema, we refer them to a GP to discuss an anti-inflammatory diet. Given the excess load of the lymphatic system along this presentation, it is better not aggravating it. And to loop back on the topic of this blog, even when you hurt yourself badly with a major injury, or you may be suffering from chronic pain, a balanced diet rich in veggies and fruit, grain and fresh food, is recommended over junk food and inflammatory meals. Top Pro-Inflammatory Foods to Watch Out For: Highly refined vegetable oils Fried foods High-sugar snacks and drinks Ultra-Processed meats How Massage Therapy Helps (and Why Sometimes Hurts) Many forms of massage, especially those where you may experience discomfort and pain, like Remedial Massage or Thai Massage, or even technique like Dry Needling, aim to reproduce microinflammatory response, and that’s why they are effective in helping you with recovery. Indeed, that pain response, is an alarm for your nervous system, which is pushed to send nutrience to the area affected by the pain. Now, what is important is to understand the time frame of healing, the subjective history of the patient we are working with and the level of injury they are presenting with. Massage helps by: […]
Category Archives: Blog
Blog
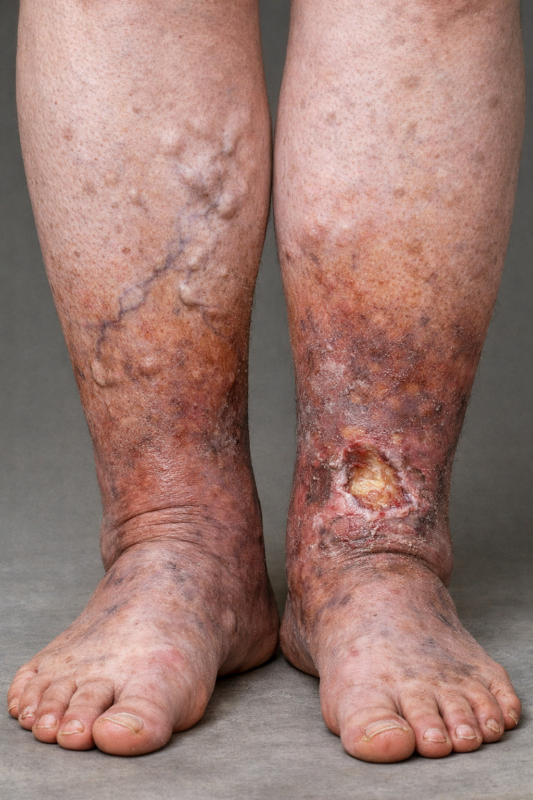
Chronic Venous Insufficiency and Swollen Legs: Compression Is The Way To Go
In Australia, Chronic Venous Insufficiency (CVI) affect more women than men, with a ratio of [...]
Continue readingMar
Blog
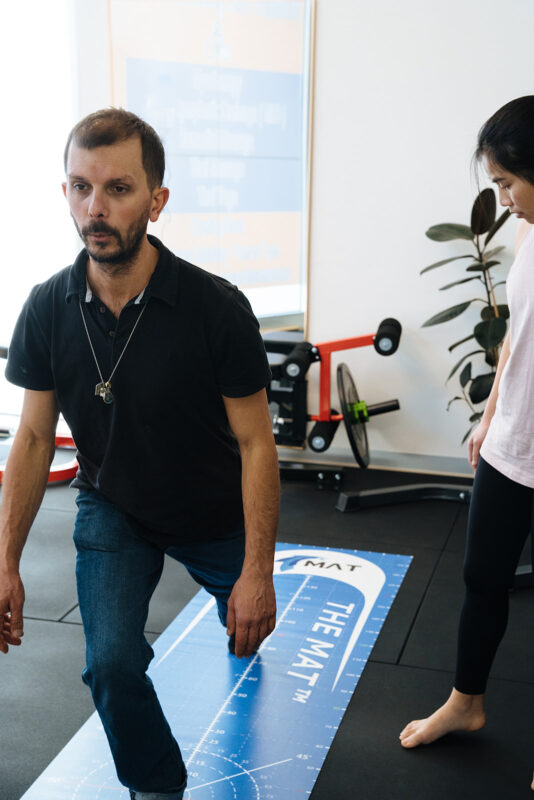
It Is Never Too Late To Join A 1:1 Fitness Class
At Melbourne Massage and Treatment in Fitzroy North, as a clinical Myotherapist, I am enthusiastic [...]
Continue readingMar

Blog
MLD vs Lymphatic Massage: A Clinician’s Guide to What Works and Why
If you’re searching for lymphatic therapy in Fitzroy North, it’s common to see terms like [...]
Continue readingFeb

Blog
Shoulder Pain Isn’t Just a Shoulder Problem
Shoulder pain is one of those presentations that can stop you from enjoying your day. [...]
Continue readingFeb
Blog
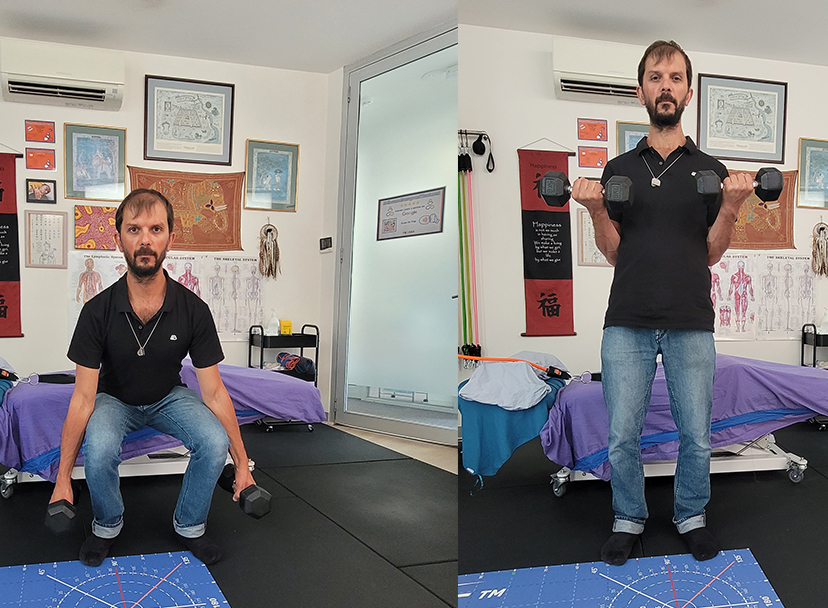
Glutes strengthening – Time To Exercises
Here in Fitzroy North, at my Myotherapy Clinic and 1:1 fitness class studio, I get [...]
Continue readingFeb

Jul
When we have to choose what to do with our free time, in order to help our body stay fit and strong, we better choose wisely on the type of activity that we do. That’s why knowing what does what to your body can help you make smarter choices for your well-being and your future. In this blog, we are going to break down the benefits of Pilates and strength training are and why, for improving your muscle mass (not becoming bulky, but mainly maintaining a minimal strength) and improving your bone mass (which we all are going to lose while we age, especially women) you better start lift heavy. Muscle Mass: Strength Training Wins As discussed in many other blogs, while we age, our muscle mass decreases, and not only that, but the muscles become less efficient in doing what they are supposed to do. So, if your goal is to build muscle mass, which has nothing to do with becoming bulged and a gym junk, there’s no debate that strength training is the superior option compared to pilates. This is possible because, to stimulate the muscle to grow and stay active, they need to be placed under load, specifically, and an increase in load. In fact, strength training involves lifting weights or using resistance to progressively overload your muscles. This is what would trigger muscle hypertrophy, which is the process by which muscle fibres grow in size and strength. For doing so, you may use dumbbells, resistance bands, barbells, or bodyweight exercises; what matters is the intensity and the gradual increase in load, which can not be done only via body weight. On the other hand, Pilates focuses on control, alignment, and core stability. Some small muscle initially would be place under an increase form of load, and yes, they would get stronger, but, once you reach the max setting of you reformal machine, or the max weight in your mat pilates training, there would no be any extra stimulus for your muscle mass to increase, because all off that doesn’t provide enough resistance to stimulate hypertrophy. Bone Density: Strength Training is More Effective Bone density is one of those hot topics in the realm of longevity. Bone density, especially in women who have reached menopause it is a real concern. In fact, women who are past 2 years of menopause, on average, lose about 25% of their bone mass, which does leads to higher chance of osteoporosis, osteopinia and bone fracture. So, one of the most powerful tools we have for maintaining or improving bone density is strength training, especially weight-bearing, high-impact, or resistance-based movements. The reason why this is a fact lies behind the bond’s response to mechanical load. When we lift weights, our bones, like the muscles, experience stress, a positive stress, which stimulates osteoblast activity. Osteoblasts are simply the cells responsible for laying down new bone tissue. While we age, this process slows down, due to metabolism changes, and an external stimulus, such as impact load (jumping literally with weights on), leads to stronger, denser bones. It is simply a cause-and-effect relationship. Regarding Pilates, particularly on the mat or even when using a reformer machine, it is low-load and low-impact. This characteristic, as just explained above, doesn’t apply to the kind of mechanical force needed to drive fundamental improvements in bone mineral density. Neuromuscular Control: This is Where Pilates Shines While I am sharing this fact about strength training, I want to make sure that this blog post doesn’t pass as a message against Pilates. In fact, if there’s one area where Pilates truly excels, it’s neuromuscular control. Neuromuscular control is the ability of your nervous system to efficiently coordinate muscle movements. Basically, the ability to switch on a muscle when needed. If we break down pilates in its practice, we can see that in a session, we do controlled movement with a strong focus on alignment, breath, and core engagement. This type of mindful movement is what can help in retraining the brain-muscle connection, which would lead you to improve coordination, proprioception, balance, and posture. And here is a short list of who would benefit from it: Recovering from injury. Dealing with chronic pain. Develop better movement awareness. That said, even strength training improves neuromuscular efficiency, especially when doing functional movement under load, like squats, but it’s typically more gross motor-focused. The fine control and subtle activation required in Pilates make it unique for developing stabilising muscles and corrective movement patterns. So, Which One Should You Choose? As expressed at the start of the blog, if you have to choose between the two, as you may have limited time to dedicate to fitness and or limited budget to pay for a class or a trainer, you should choose based on your fitness goal. Do you want to improve your neuromuscular control at the expense of low bone mass and the increased risk of losing bone mass (especially if you are past your 40s), then go for Pilates. On the other hand, if you want to guarantee that your body can keep up with the slowing of metabolism and can maintain its functionality in the long term, strength training is the way to go. In summary: Use strength training to build muscle, strengthen bones, and increase metabolic function. Use Pilates to refine your movement, stabilise your joints, and enhance your core control. And if you can do both, go for it. Together, they complement each other beautifully. And if it helps, think of strength training as your foundation, and Pilates as your refinement. How often should you train then? This is a common question that people ask all the time. The answer depends on what you are aiming for and what your needs are. If we simplify the case scenario, and we look at someone who has great mobility (not flexibility, but mobility) and does aim to build muscle strength and bone mass, they should train between 3 to 5 days a week with strength training. If […]
I did stop counting the number of times I hear patients say that their hamstrings are tight, and that’s why they can’t bend forward. And I did stop counting, because this happens so often that it is really hard to find someone who actually knows what tissue is limiting their movement. In fact, most of the time, what is happening is not hamstring tightness, but rather a lack of hip hinging and associated hip mobility, or neural tension (in this case, the sciatic nerve neural tension). What Is Neural Tension? When we discuss neural tension, we refer to the lack of mobility of the nervous system’s connective tissues, so the actual nerve as a fibre or tissue, when it’s put under mechanical stress (like tension, compression, or stretch). Here is an example: When we bend forward, the sciatic nerve (the largest nerve in the body) runs from the lower back (Ventral rami spinal nerve L3-S1), through the buttocks (below the piriformis muscle most of the time), and down the back of the leg (right between the hamstrings muscles). When doing such an action, the nerve needs to glide freely, and if any where along its journey, there is a compression, due to other tissue tightness or inflammation, or even a physical outer pressure (a belt from the pants) it becomes irritated, compressed, or “stuck” ending not moving well. That’s where you may experience a pull on the back of the leg. That is neural tension. More specifically, your symptoms can be: A deep pulling or burning stretch in the back of the thigh or calf. Tingling or numbness (especially if holding the stretch for a longer time) A sensation of “snapping” or “tugging” deep in the leg when stretching Limited range of motion that doesn’t improve with traditional hamstring stretches How Is Neural Tension Different from Muscle Tightness? While neural tension and muscle tightness may feel similar, they are fundamentally different in their causes and treatments. Muscle Tightness Neural Tension Origin Muscle fibres are shortened or tense Nerve or nerve sheath is restricted or irritated Sensation Broad stretch, fatigue, cramping Sharp, burning, electric, or pulling sensation Area Felt Localised to the muscle belly Along a nerve pathway (e.g., back of the leg) Improved by Stretching and massage Nerve gliding/mobilisation, reducing irritation Common in Athletes, post-exercise, poor posture Sciatica, herniated discs, hipo-mobility, and a sedentary lifestyle Now, Let’s Talk About Forward Bending When bending forward with the upper body, aiming to reach the toes or the floor with the hands, we may experience a stretch in the back of the leg. That stretch it may not be only your hamstrings but also the sciatic nerve. When this nerve lacks mobility, as expressed earlier, due to things like disc issues, facet joint irritation, piriformis syndrome, or general irritation, it can feel like your hamstrings or calf or back are tight, even when they’re not. A good way to understand if the feeling of tightness is from your nerve or not is to perform a Slump Test. How to perform a Slump Test? Below is a step-by-step guide on how to perform the slump test: Sit on a chair or table, where both feet are off the ground; Slump your body forward, while looking straight ahead, and your arms are crossing behind your back (which means your spine rounds backward, your shoulder drops forward); Now, start lifting up one leg, while the other one is bent at the knee at 90°; While you lift up the leg, start noticing if you feel any pulling sensation from the lower back going down to the back of the leg or calf (it could be anywhere along the lower back to the feet); If you manage to reach full leg extension, now, start looking down (you may notice tension arising or increasing); If nothing happens yet, then bring your toes (of the leg raised) backwards (ankle dorsiflexion); If, along any step of this process, your pulling sensation increases (more intense) or becomes longer (like from only the back of the leg, it now feels even in the back or in the calf), this is neural tension. Indeed, the tension would feel like a long rope pulled across multiple joints (lumbar, hip, knee) with a burning sensation and maybe some pins and needles. Next, to experiment further with the neural tension, start looking up with the head, go if you can in full cervical extension, and you should feel relief in the back of the leg tension. This last step is proving to you how, by releasing the central nerve (that travels in the central canal of your spine), the neural tension slows down. You are stopping the nerve’s pull from its origin, the brain. Should You Stretch a Nerve? No, not really. Nerves aren’t designed to be stretched like muscles. In fact, if you keep stretching a nerve aggressively, you may end up irritating the nerve and worsening the symptoms. Instead, use nerve gliding or joint mobilisation exercises, which are gentle, rhythmic movements that help the nerve move through its surrounding tissues without overstressing it. And to stay in the loop, let’s look at the sciatic nerve glide: Lying on your back, lift one leg while keeping the knee slightly bent. Slowly extend the knee and flex the foot back toward you, then release. Repeat in small, pain-free ranges. This can help restore nerve mobility without aggravating the nerve. If this is not the case, and you still experience pain and discomfort, then it is probably time to book an appointment (myotherapy) to ensure there is not significant entrapment along the nerve pathway, and see what can be done to relieve that compression. How Myotherapy Can Help with Neural Tension? As a Clinical Myotherapist, I specialised in assisting people with any sort of musculoskeletal issue. Neural Tension is one of those. During a Myotherapy session, we would address, via a detailed clinical history and a series of assessments, what may be the cause of the neural […]

Jul
When the space between the collarbone and first rib gets tight, during movement or even at complete rest, it can lead to Thoracic Outlet Syndrome (TOS). Between the two structures mentioned above, we have the passage of the thoracic plexus (nerves) and blood vessels. The compression of those structure, can result in pain, weakness and numbness radiating down the shoulder, arm, and hand. Because TOS has multiple causes and presentations, effective treatment depends heavily on accurate assessment and an individualised approach, and that’s where myotherapy can play a crucial role. What Causes Thoracic Outlet Syndrome? As there are different tissues passing by this space, the nature of TOS can be broadly categorised into three types: Neurogenic TOS: Compression of the brachial plexus (nerves). Venous TOS: Compression of the subclavian vein. Arterial TOS: Compression of the subclavian artery. But not only can different tissues be compressed, but different structures can be responsible for the compression. Indeed, the compression can be due to the scalene muscle, pectoralis minor or bone. And here are some common causes: Muscle imbalances that lead to poor posture (forward head/rounded shoulders); Repetitive overhead activities (which lead to constant compression of the tissues); Trauma (e.g. whiplash or clavicle fracture); Anatomical variations (such as a cervical rib). The Role of Myotherapy in TOS Assessment As a myotherapist, when treating someone with suspicious TOS, we go for a series of assessments that we compare to the clinical history and symptoms. The test itself would aim to reproduce the patient’s symptoms and guide us on what potential structure is compressed. If we are suspicious of TOS, we can aim to reduce tension in soft tissue and give exercises that can reinforce those structures to alleviate any compression in the area. Orthopedic Testing & Myotome Assessment Some common assessments include: Adson’s Test (for scalene involvement) – It consists of reproducing a drop of heart bit in the wrist (affected side) by asking the patient to abduct and extend the arm while rotating (same side) and extending the neck. This would add extra compression on the suspected structures. Roos/Elevated Arm Stress Test (to reproduce vascular or neural symptoms) – It is about asking the patient to lift the arm at 90°/90° and start closing and opening their hands repetitively for 30 seconds to 1 minute. A drop of strength or symptom reproduction would lead to a positive test. Costoclavicular Maneuver (to assess space between clavicle and first rib) – It is delivered by having the patient with depressed and retracted shoulders. The positivity of this test is given by the reproduction of symptoms or a reduction in the distal wrist. Wright’s Hyperabduction Test (for pectoralis minor tightness) – The patients get asked to lift their arm (affected side) above their head while the therapist stands behind and keeps count of the wrist heartbeat. Any symptoms, reproduction, or drop in bit is considered positive. In addition to those tests, we would use: Myotome testing: which assesses the motor function of specific spinal nerve roots; Clinical history: Any history of previous injury, surgeries, work and sport loads; Type and timing of symptoms: When and how those symptoms are reproduced on daily life. All this said, we always have to consider that as therapists, myo or physio as per osteo exc… we can assume that the positivity of many of those test leads to a positive or negative conclusion regarding TOS. Hands-on treatment and exercises in combination can be the easy steps to take to treat the presentation, but can not always guarantee the best outcome, due to each individual’s unique presentation. Hands-On Treatment and Exercise Prescription Once we have more understanding of what is potentially happening in terms of compression, a myotherapy treatment focuses on addressing the underlying causes: Manual Therapy Myofascial release of the scalene, pectoralis minor, and upper trapezius muscles. Trigger point therapy to reduce local and referred pain patterns. Joint mobilisation to improve scapular movement and rib mechanics. Neural gliding techniques to encourage nerve mobility and reduce irritation. Exercise Rehabilitation Postural re-education, particularly strengthening the deep neck flexors and lower trapezius. Scapular stabilisation exercises to improve shoulder mechanics. Breathing retraining is necessary if dysfunctional patterns (like apical breathing) are contributing to compression. Neurodynamic stretches are appropriate for nerve mobility. Together, these interventions help reduce symptoms, improve function, and support long-term recovery. The time frame for improvement, if not complete reduction of the symptoms, can be different per individual, but we can estimate a period of time that goes between 12 and 16 weeks. If no changes are reproduced within this time frame, that’s where we would refer the patient elsewhere for further investigations, like a scan. When Is Surgery Needed for Thoracic Outlet Syndrome? Surgical intervention is typically reserved for cases where conservative care fails or in cases of vascular TOS, where there’s a risk of thrombosis or embolism, but also where anatomical variations, like a cervical rib is present. Surgical procedures may include: Scalenectomy (removal of the scalene muscles) First rib resection Clavicle decompression or repair if there’s previous trauma These operations aim to create more space in the thoracic outlet, thus relieving the compression. Post-Surgical Recovery and the Role of Myotherapy In case of surgery, as a myotherapist, we can still help and ensure a correct recovery post-intervention. Treatment like MLD can help in flushing excess liquid out of the surgery area, but again, we would look into exercises as a form of recovery and rehabilitation of the area affected by the surgery and or affected by the lack of strength that is a consequence of a prolonged period of muscle weakness. More broadly, myotherapy treatment can help with: Pain management Scar tissue Muscle guarding or weakness Neurological symptoms that may persist or reappear Do You Need a Scan if we’re suspicious of TOS? Imaging, as discussed in other blogs, may be recommended when we are suspicious of other presentations, or if standard method are not creating any difference. For example: To rule out cervical disc herniation, tumours, or other causes of neurovascular symptoms. When […]

Jul
Nerves are the body tissue that control motion, sensory feeling, and can create a pain response. When nerves get damaged or compressed, due to tight structures, like muscle or ligaments of the spine, because of lack of strength, injury, external forces, the pain reproduced or the weakness caused to certain muscles can be quite annoying and make daily activities challenging. In this blog, I will break down the basics of nerve structure, the types of nerve injuries, how nerves recover, when surgery is appropriate, and how Myotherapy can play a supportive role in your rehabilitation journey. What’s the Nerve Structure In order to better understand nerve damage, let’s compare the nerve to an electric cable: Axon: This is the core wire that transmits electrical signals. It’s the long extension of a nerve cell (neuron) that communicates with muscles, skin, and other tissues. This structure is indeed the equivalent of the copper wire in the electric cable. Myelin Sheath: A protective, fatty coating that wraps around the axon and helps speed up the transmission of nerve signals. To ensure the signal can travel smoothly along the axon, the myelin sheath works as a coating layer that doesn’t allow dispersion. Endoneurium, Perineurium, Epineurium: These are connective tissue layers that bundle individual axons into fascicles (groups), and fascicles into full nerves, like insulation and support around an electric cable. Thanks to this multilayer organisation, the nerve’s structure is both efficient and delicate. Therefore, damage can occur to any part of this system, and based on the layers that are damaged, it will determine how the nerve recovers, including the need for external interventions (surgery) and the time of recovery. Symptoms of Nerve Damage Based on the type of nerve damage, you may experience different types of symptoms. Sensory Nerve Damage (affects feeling/sensation): Numbness or reduced sensation (especially in hands, feet, or limbs) Tingling or “pins and needles” Burning or shooting pain Heightened sensitivity to touch (even light touch feels painful) Poor coordination or balance (especially in the dark or with eyes closed) Motor Nerve Damage (affects movement/muscles): Muscle weakness or heaviness Muscle twitching or cramping Difficulty with fine motor tasks (e.g., buttoning a shirt) Muscle atrophy (wasting) over time Dropping objects or foot drop (inability to lift the front of the foot) Autonomic Nerve Damage (affects internal organs/functions): Dizziness or fainting when standing (due to blood pressure regulation issues) Abnormal sweating (too much or too little) Digestive problems (bloating, constipation, or diarrhea) Bladder dysfunction (urgency, incontinence, or retention) Heat intolerance or inability to regulate body temperature Other General Signs: Pain that follows a specific nerve path (e.g., sciatica) Delayed healing or tissue changes (e.g., in diabetic neuropathy) Sensory loss that makes walking or using limbs unsafe When reading those symptoms, we have to be aware that multiple symptoms can be present, and that some symptoms may be related to other pathologies, so that’s why consulting with a physical therapist or the GP is the best step to better understand what is happening. Types of Nerve Damage Nerve injuries are classified based on the severity of the injury. Neuropraxia (mild):A temporary block in signal transmission, often due to compression or stretching. The structure remains intact, and recovery is typically quick. Think of when sleeping with the arm in a funny position, or sitting for too long with one foot under the tight, and either the arm or the leg goes numb. Axonotmesis (moderate):The axon is damaged, but the surrounding connective tissues are preserved. The nerve can regrow, but it takes time. It is estimated that the axon can regrow 1 mm per day up to 18 months. This gives you the opportunity to regrow a nerve from head to toes. Neurotmesis (severe):The nerve is completely severed — both axon and connective tissue. Without surgical repair, recovery is unlikely. This is obviously the worst-case scenario, and it is more common in severe incidents, when an external factor may lacerate body tissues. Each type of injury presents differently, from numbness and tingling to complete loss of movement or function in the affected area. In fact, nerves not only transmit sensation, but also allow muscles to contract and move. So, a lack of strength, sometimes, can be due to a nerve compression and not from a lack of actual muscle load capacity. When Is Surgery Needed? As we just saw, surgical intervention is usually recommended when the damage is extended to the full nerve structure and: There is a complete nerve severance (neurotmesis). There is no sign of functional recovery after several months. Scar tissue or compression is impeding nerve signal transmission. There is associated structural damage (e.g., after fractures or deep lacerations). In order to restore nerve functionality, the surgeons may attempt nerve repair, grafting, or decompression, depending on the case. How Fast Can Nerves Regrow? Peripheral nerves (outside the brain and spinal cord) do have the ability to regenerate, but slowly. On average: Nerve regrowth occurs at approximately 1 mm per day, or roughly 1 inch per month. Recovery can take months or even years, depending on the distance the nerve needs to travel and the extent of the damage. During this time, muscles and tissues that rely on the nerve may weaken, which makes active rehabilitation crucial. Indeed, to ensure a complete recovery, we want to stimulate via hands-on treatment and exercises the needs of the nerve to regrow. So, by stimulating the structure like the muscles controlled by the damaged nerve, we can stimulate the nerve itself to regenerate. On the other hand, be aware that nothing can make your nerve grows faster, but we can ensure that the regrowth is stimulated. The role of Myotherapy for Nerve Recovery As a myotherapist, I focus on assessment, treatment, and rehabilitation of musculoskeletal pain and dysfunctions. Thanks to this approach, via the hands-on treatment and exercises skills learn during my Clinical Myotherapy training, I can help immensely someone who is suffering from nerve damage. Hands-On Therapy Assessment first A fundamental tool to ensure we […]

Jun
Cosmetic surgeries have become increasingly common, with procedures such as liposuction, tummy tucks, facelifts, and breast augmentations helping people achieve their desired aesthetic goals. However, while the surgical aspect gets most of the attention, what often goes under-discussed is the importance of post-operative care, especially Manual Lymphatic Drainage (MLD) in promoting faster, smoother recovery and reducing the risk of ending with fibrosis tissue build up underneath the skin. What Is Manual Lymphatic Drainage (MLD)? MLD is a gentle, rhythmic massage technique designed to stimulate the lymphatic system and encourage the natural drainage of lymph fluid. The lymphatic system plays a crucial role in immune function and fluid balance. After cosmetic surgery, lymphatic flow can become disrupted due to inflammation, surgical trauma, or temporary damage to lymph vessels. While the first few days post-surgery are dedicated to acute recovery and the taking of Antibiotic to reduce the risk of infection post-surgery, as soon as this risk is passed, that’s when you want to start your MLD journey. Why Is MLD Important After Cosmetic Procedures? Cosmetic surgeries often cause swelling, bruising, and fluid accumulation (known as seroma or edema). This is due to the body reacting to an invasive procedure and removing tissue beneath the skin. MLD helps: ✅ Reduce post-surgical swelling ✅ Accelerate the removal of metabolic waste and excess fluid ✅ Improve skin texture and reduce fibrosis (hardened tissue) ✅ Speed up visible results by enhancing contour definition ✅ Decrease discomfort by reducing pressure from trapped fluids As with any surgery, when lymphatic drainage massage is applied, no pain is to be experienced. While I treat someone with MLD I always pass this information up front, to ensure that if they experience any type of pain, I get told about it, so that I can go lighter with pressure. Which Procedures Benefit Most from Lymphatic Drainage? MLD is commonly recommended after: Liposuction (including 360 lipo or Brazilian Butt Lift – BBL) Tummy tucks (abdominoplasty) Facial surgeries (rhinoplasty, facelifts, blepharoplasty) Breast augmentation or reduction Body contouring procedures As a Lymphoedema therapist, I do get surgeons referring me patients to assist them with post-op management, especially when swelling or fibrosis is a concern. When Should You Start Lymphatic Drainage? As briefly explained above, the ideal time to begin MLD is as soon as you stop your antibiotic cycle, and is your surgeon or GP call to when you are safe to do so. On the other hand: Typically, MLD is started 3 to 5 days post-surgery, once acute inflammation has settled and the incision sites are closed or protected. A full course may include 6–10 sessions spaced out over a few weeks for optimal results. Always follow the advise of the surgeon about post surgery, but, when you safe to do, the more movement we add to Lymphatic Draiange, the better the recovery would go. Is MLD Safe post-cosmetic surgery? When performed by a qualified lymphatic therapist, lymphatic drainage is non-invasive, safe, and effective. It’s gentle enough for delicate post-op tissue and can significantly improve comfort and healing time. My qualification in Lymphatic Drainage was done with the Vodder Academy whicg holds the gold standards for MLD practice, and is worldwide well known for the quality of their practice. On the other hand, I also hold a qualification in Clinical Myotherapy, which allows me to help people recover from injury and stick to their fitness goals via training and exercises. When Can I Book My Appointment for Post-Cosmetic Surgery Recovery? My studio, Melbourne Massage and Treatment, is located in Fitzroy North, on the corner of St George Rd and Holden St. I work Monday to Saturday, and to book an appointment, you can just head online to the booking page and choose the best time/days that work for you. Given the number of session needed for this type of work, I always suggest to book a series of session in a raw, from to 3 session per week for the first 2 weeks. Session by session we do evaluate together the progress, and chose together what’s the next step. If you have any questions, please do not hesitate to contact me. FAQs – Cosmetic Surgery & Lymphatic Drainage

Jun
Temporomandibular Joint (TMJ) disorders are a common source of jaw pain, clicking, and discomfort that can impact anyone at any age. At Melbourne Massage and Treatment in Fitzroy North, I see many clients presenting with TMJ clicking and associated symptoms. One of the key factors behind the painful symptoms is retrodiscal tissue compression, a condition that not only causes joint noises but may also lead to chronic jaw pain. What Causes TMJ Clicking? Let’s start understanding why TMJ clicks. When looking at the TMJ, we can see that between the two bones that make up the joint, there is a disk, called the articular disc, which is made of cartilage and is meant to keep the bones apart (the temporal bone and the mandibular condyle). In a healthy joint, the disc moves smoothly with the jaw during opening and closing. But when the disc is out of alignment, the condyle may snap over it, creating that characteristic “click.” For reference, a condyle is a rounded protuberance at the end of a bone, which in this case, fits into a cavity. The Role of Retrodiscal Tissue Compression in TMJ Clicking and Pain Right behind the disc lies a tissue known as the retrodiscal tissue, which contains blood vessels, nerves, and connective tissue. When the disc is displaced anteriorly, the condyle may compress this sensitive area during jaw movements. This compression can lead to: Inflammation Persistent pain Increased joint stiffness Neurovascular irritation This is possible because the tissue, as mentioned earlier, is innervated, whereas the disk is not. Therefore, the disk compression on its own is not going to replicate any pain, as there is no nerve to pick up any stimulus in there. Forward Head Posture Would Not Help. Forward head posture is a common presentation linked to TMJ clicking. Forward head posture is characterised by the head sitting forwards compared to the midline of the body, and is often due to a lack of strength in deeper neck flexor muscles. This presentation can make the TMJ presentation worse because of the excessive load placed on the muscles that surround the TMJ (masseter and temporalis muscles). Other reasons include the misalignment of the teeth, which can make the chewing action more difficult and over time, create strain along the TMJ tissues (muscles, ligaments and tendons), but also referral pain from the cervical joint tension can lead to manifest stress in the jaw and face muscle due to constant pain and discomfort. How Myotherapy Can Help At Melbourne Massage and Treatment, I offer a combination of evidence-based manual techniques and exercise therapy to address the root causes of TMJ dysfunction, aiming not just to manage symptoms but to promote long-term recovery. 1. Joint Mobilisation Gentle mobilisation techniques to the jaw, cervical spine, and upper neck can reduce joint restriction, improve mobility, and relieve the pressure on retrodiscal tissue. Mobilisation helps restore normal disc-condyle mechanics, reducing clicking and improving range of motion. 2. Dry Needling Dry needling of trigger points in the masseter, temporalis, and lateral pterygoid muscles can reduce hypertonicity and relieve pain referred to the jaw and head. Targeting myofascial restrictions can also indirectly reduce stress on the TMJ itself. 3. Targeted Exercise Therapy Specific exercises for jaw control and cervical strength are crucial for maintaining results between sessions. Jaw isometric exercises are ideal for pain management and quick relief. Resistance bend exercises for jaw opening. Relaxation techniques for parafunctional habits like clenching Over time, these exercises can enhance joint stability, reduce overloading, and in some cases improve mild degenerative changes by promoting better joint mechanics and tissue resilience. 4. Deep Tissue Massage Massaging the muscles surrounding TMJ and the cervical muscles can help reduce tension, stimulate the nervous system to relax and give a break from pain and discomfort, while improving mobility. As always, there is not one solution for the common presentation of many. Each individual is different, and the treatment results can be different. But what we can expect is that, if we balance the usage of hands-on treatment and exercises, we can create some real change with some great benefits. TMJ Clicking and Menopause Menopause is a topic I have already spoken about in my blogs. Briefly, we can refer to menopause as the period of 12 months or more of missing menstrual periods in a woman’s life cycle. Before that is called perimenopause, and after that, we talk about post-menopause. This step is achieved when a woman has no more eggs to release, and her menstruation has stopped. While it is not the same journey for each woman and there are many changes that women can go through, a common one is stiffness of ligaments. Again, this is not happening in one day, but is a change that comes with time and is different person to person. This is possible because of the lack of estrogen. Indeed, estrogen, along with controlling many other aspects of the biological life of a woman, is also responsible for the elasticity of the ligament. Put: less estrogen, less elasticity. This can explain why, during this phase, women start experiencing more TMJ pain and potentially TMJ clicking. On the other hand, we have no yet enough evidence to say that Hormonal Replacement Therapy is effective for establishing this presentation (Robinson et al., 2019). FAQ – TMJ Clicking 1. What causes the clicking sound in the TMJ?The clicking occurs when the articular disc in the jaw joint becomes displaced, and the mandibular condyle snaps over it during jaw movement. This is often due to disc misalignment. 2. Why does retrodiscal tissue compression cause TMJ pain?The retrodiscal tissue contains nerves and blood vessels. When compressed due to disc displacement, it can lead to inflammation, pain, and stiffness in the TMJ area. 3. Can TMJ clicking happen without pain?Yes. If the articular disc is displaced but the retrodiscal tissue isn’t compressed or irritated, the joint may click without producing pain. 4. How does forward head posture affect TMJ?Forward head posture strains neck muscles […]
Jun
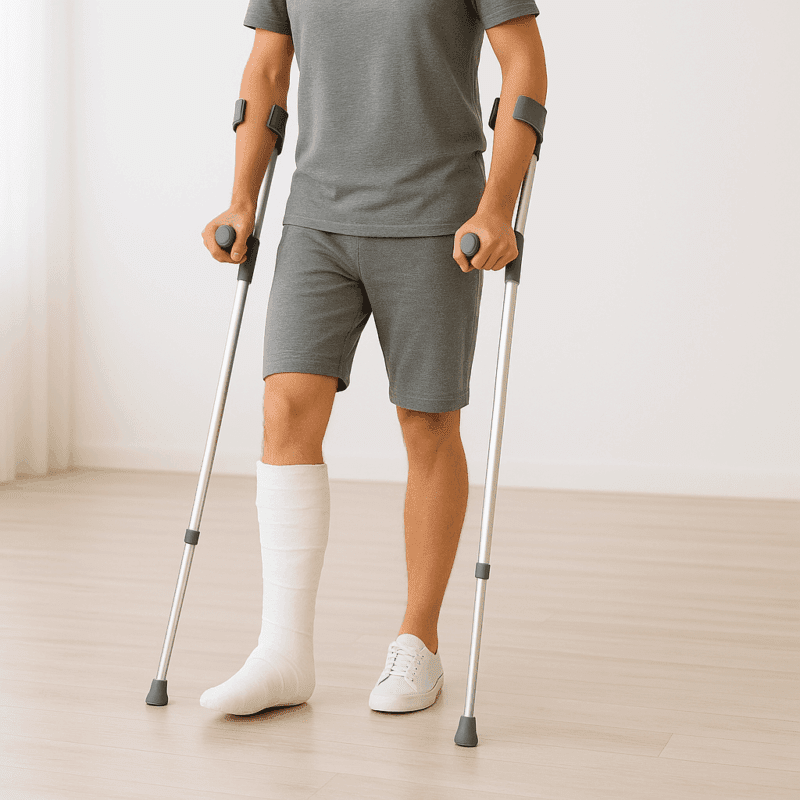
Bone fractures are a common injury, but with proper care and rehabilitation, bones can heal and regain strength. Strength exercise is a crucial component of this healing process, aiding in bone regeneration and restoring mobility and function. How can a bone fracture? Bones can fracture when placed under a load or force that they can’t tolerate. The load tolerance is subjective, person to person, and can vary based on the individual medical presentation and clinical history. Age it is only a circumstance that at the current moment in our society is seen as an increase the chance of fracture, but if we learn to age by keeping our feet via strength training, age would not be anylonger a risk component. Indeed, during the aging process, the bone can become weaker if not stimulate to positive stress, such as load active loads. The less load they received, the less the bone would keep regenerating, due to a slower metabolism. Therefor, as explained in other blogs, strength training is a key to longevity and better health. How can bone fractures heal? When a bone fractures, the body initiates a complex healing process involving several stages: Inflammation: Immediately after the fracture, blood clots form, initiating the healing process. Soft Callus Formation: Fibrocartilaginous tissue begins to bridge the fracture gap. Hard Callus Formation: The soft callus is replaced by a hard bony callus made of woven bone. Remodelling: The bone gradually remodels into its original shape and structure. This process can take several weeks to months, depending on factors like age, overall health, previous clinical history, medication intake and the severity of the fracture. Even though there is nothing that can speed up the recovery, as this is a body’s natural process, there are things that can be done to assist the recovery and ensure that the healing happens as smoothly as possible. Exercises are one of those factors that are part of the healing journey, but have to be incorporated under supervision, to ensure not to aggravate the presentation. The Role of Exercise in Bone Regeneration As mentioned above, and in other blog exercises, specifically strengthening exercises are a positive load for the body tissues, including bone, which can help stimulate the regeneration of those tissues. Obviously, different phases of healing require and can accept different types of strength exercises. So yes, you would not start with a single-leg jump on a broken tibia Stimulates Bone Formation: Mechanical stress from exercise promotes osteoblast activity, leading to new bone formation. Enhances Strength and Flexibility: Regular movement prevents joint stiffness and muscle atrophy. Improves Balance and Coordination: Reducing the risk of future falls and fractures. A systematic review by Kuijlaars et al. (2019) highlighted that physical therapy exercises, whether home-based or supervised, significantly improve functional mobility and strength post-fracture. Recommended Exercises for Recovery At Melbourne Massage and Treatment, I offer assistance with bone fracture recovery exercises throughout the Myotherapy and Fitness class treatment plan. What I would focus on, too, when aiming for recovery, would be: Weight-Bearing Exercises: Including walking or gentle jogging (if we are talking about lower limb injury), to stimulate bone growth; Resistance Training: Using bands or light weights to strengthen muscles supporting the bone, or the joint to which the bone is attached. Flexibility and Balance Exercises: Again, using weights and machinery, we aim to strengthen the muscles that control your overall equilibrium and stability to prevent further falls and reduce the risk of injury. Plyometrics which is most often towards the end of a recovery process from anytype of injury, where we focus on motion that are more close to return to daily activity, and we load your tendon as springs, as per can be doing jumping on the spot or repetitive explosive motions with arms. Clinical Evidence Supporting Exercise in Recovery from Bone Fractures Research, as already mentioned in the Kuijlaars et al. (2019) systematic review, shows the benefits of incorporating exercise into fracture rehabilitation, and below we look into more details about what exercises have to offer in terms of recovery: Improved Healing Rates: Patients engaging in structured physical therapy often experience more robust bone healing (Song, 2022). Reduced Complications: Regular movement decreases the risk of complications like deep vein thrombosis or joint stiffness (Ruan et al., 2023). Enhanced Quality of Life: Maintaining physical activity levels improves overall well-being and independence (Mahindru et al., 2023). What to consider when doing exercises post-bone fractures. While exercise is beneficial, it is always important to approach the recovery process with care: Follow Medical Advice: Always adhere to the guidelines provided by healthcare professionals. Avoid Overexertion: Pushing too hard can hinder healing or cause re-injury. Going hard or going home is not how recovery works. Monitor Pain Levels: Some discomfort is normal, but sharp or persistent pain should be addressed immediately. Pain-wise, on a scale of 0 to 10, we usually aim to get you to experience a comfortable discomfort, based on your worst pain experienced as a maximum threshold. Recovery from an injury, including a bone fracture, is a personal journey, and therefore is unique to everyone, in terms of how quickly it can be and what considerations to take into place during the exercise recovery. FAQs – Bone Fractures Recovery and Strength Training 1. How do bones fracture?Bones can fracture when exposed to forces they cannot tolerate. This tolerance varies from person to person, depending on factors like health history, bone density, and physical condition. While age is often seen as a risk factor, it’s more about reduced activity levels. With consistent strength training, the risk of fractures can be lowered significantly, regardless of age. 2. How does a fractured bone heal?Bone healing occurs in four key stages: Inflammation: Blood clots form to protect and initiate healing. Soft Callus Formation: Fibrous tissue bridges the fracture. Hard Callus Formation: New bone begins forming. Remodelling: The bone reshapes to its original form.This process varies in duration based on the severity of the fracture and individual health factors. 3. Can exercise speed […]
Jun
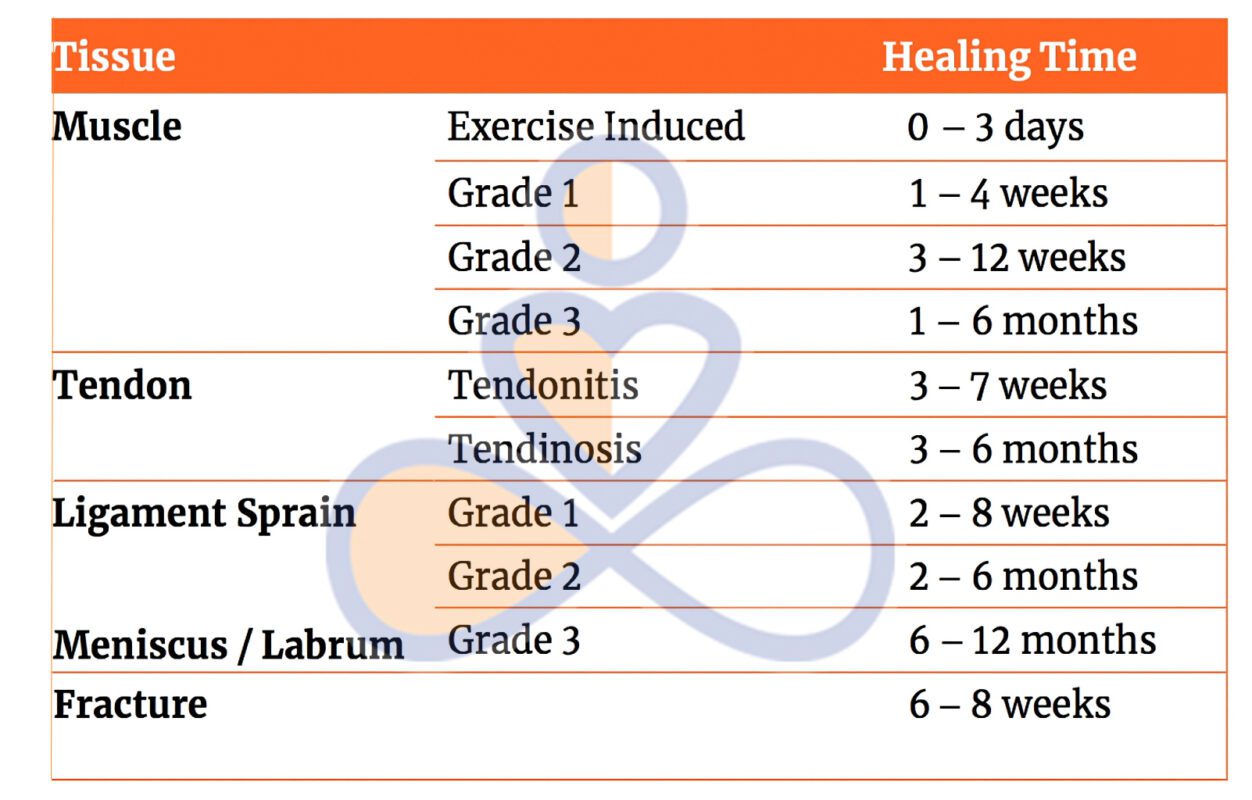
As part of our journey, an injury at any tissue level can happen at any time. When we talk of tissue injury, we don’t talk only about the skin, but also about muscle, tendon, ligament or even bone. While your body has an incredible ability to go through tissue healing, the time it takes depends heavily on the type of tissue that’s injured. In this post, we’ll explore how long it typically takes for different body tissues to heal and why some recover faster than others. Different types of tissue and their healing time Muscle Let’s start with the fastest tissue to recover, the muscles. A muscle injury is among the most common, often caused by strains, overuse, or direct trauma. Healing Time: Based on the type of injury, the muscle recovery varies, depending on the amount of tissue that needs to be recovered. Below is a simplification of the recovery time frame. Mild strain (Grade I): 2–3 weeks Moderate strain (Grade II): 4–6 weeks Severe tear (Grade III): 2–3 months or more Why does it vary? Muscles are the fastest tissue to recover, due to a high blood and innervation supply, which helps them receive more nutrients and stimulation, which are at the basis of the healing process. However, the severity and location of the injury significantly influence recovery time. Bone Fractures can range from minor stress fractures to complete breaks. In this other blog, we discussed the different types of bone fractures and how MLD can assist recovery. Healing Time: Minor fracture: 4–6 weeks Moderate to severe fracture: 6–12 weeks Complex or surgical fracture: 3 months or longer Why does it vary? The bone, compared to a muscle, does not have a heavy blood supply, and also is a hard structure, which, before it can be regenerated, needs to go through different processes, like: inflammation, soft callus formation, hard callus formation, and remodelling. Multifactorial factors are the reason why this process may take longer to happen, including Age, nutrition, and whether surgery was required, and bone density. Tendons Tendons connect muscles to bone and are commonly injured through overuse or trauma. Healing Time: Mild strain or tendinitis: 4–6 weeks Partial tear: 6–10 weeks Complete rupture (often requires surgery): 4–6 months or more Why does it vary? Tendons have a relatively poor blood supply, which slows healing. They also bear high loads during movement, so rest and controlled rehab are crucial. Ligaments Ligaments are the tissue that connect bone to bone and give joints the stability needed to support body weight and allow movement and mobility. Joint sprains are the most common ligament injuries. Healing Time: Mild sprain (Grade I): 3–6 weeks Moderate sprain (Grade II): 6–10 weeks Severe sprain or tear (Grade III): 3–6 months (may require surgery) Why does it vary? Ligaments sit deep in the joint, and again, the lack of blood supply makes it hard to have a quick recovery time. In this case, then, we have to consider that once a Ligament is injured, it is not going to return to its full capacity, and to ensure an effective recovery and stop the recurrence of injury, the strengthening of the muscles that surround the joint is essential. This process is possible only thanks to strength training. Why Tissue Type Matters As already explained above, different types of tissues heal at different times due to a series of factors. Below, we summarise them: Blood supply: More blood means more oxygen and nutrients to aid healing. Indeed, positive stress like exercise and movement is a key component for establishing a recovery. For all the structure, the starting type of exercises for initial recovery is the Isometric exercises. Cellular structure: Some tissues regenerate faster due to the type of cells they contain and based on how those cells work. Function and stress: Tissues under constant use or mechanical load (like tendons and ligaments) need more recovery time. In fact, even if the mechanical stress is a positive type of stress that is needed for recovery, even the rest time is important, as Ligaments and Tendons, due to their functionality, may have a harder time resting. Supporting the Tissue Healing Process If nothing can speed up the healing process, a series of practices can help support it. Along with those practices, we find: Rest and protect the injured area (and this is usually for the first few days post-injury) Movement and strength are key roles in recovery, and they should be followed by a professional therapist. Eat a nutrient-rich diet, rich in natural food, with variety as a key practice. Being hydrated is essential for the body and organs to function and ensure the overall health of the body. Avoid re-injury by following a rehabilitation process that starts with isometric exercises and ends with a return to daily activities. Sleep and rest as the body recovers during these hours, especially in the early morning phase. How Myotherapy Can Aid a Healing Response Myotherapy, as the name suggests, “Myo=muscle” and “Therapy=Therapy”, can play a crucial role in enhancing the healing process of various tissue injuries. This is possible because during a myotherapy session, not only we stimulate the tissue with hands on treatment, via deep tissue massage, dry needling or joint mobilisation, but we also create a treatment plan based on exercises and proper fitness class, that aims to help your body recover from the injury, get strong once again, and put you in place to prevent further injuries. This approach can further help even if the injury is chronic. Yes, the tissue may be repaired, but its functionality is still impaired, and that’s how often people end up in chronic pain or create compensating habits. By addressing the mobility of the joint surrounding it and the strength of the tissue, we can change that. So if you are suffering an acute injury or going through chronic pain post-injury, book a myotherapy session, or get in touch for a 15-minute free online consultation on how I can assist […]

May
As a Clinical Myotherapist, I often work with patients who perform back squats as part of their exercise routine, and at the question: “What’s your goal with a back squat?” the answer is often vague and not specific to what this exercise is for. The reason why the answer is not specific is simply because they don’t know what the difference is between high and lower bar squat, and don’t know that the back squat, as long as it is an amazing functional movement, doesn’t train all the lower body muscles at the same level. That’s where, to prevent injury, to perform better squats, and to strengthen more evenly all the lower body muscles, I would suggest them to do exercises like: Quads curl, Hamstring curl, Cable Machine Adduction and Diagonal Extension (Glute Medius). Back Squat: The Foundation of Strength The back squat is such a great form of exercise because it trains multiple joints and multiple muscles all at once, but also allows us to use our innate capacity of squatting, which is a functional movement, to move high loads, therefore achieving more strength gains. However, this leaves us with more responsibility to train smartly. So let’s start to break down the two main types of back squat: High-Bar Back Squat (Upper Bar Position) The bar rests on the upper traps The torso remains more upright Greater emphasis on the quadriceps muscles Ideal if your goal is quad strength and knee-dominant movement patterns Ideally, you are standing with your heels elevated from the ground The fact that the bar is sitting on the upper traps, and that the torso sits straighter, would lead to a descending movement where your back thigh (hamstrings) would lean on calf muscles, and from there you will stand back up. This is why you put more force throughout the quads. Indeed, the combination of a higher bar, a straighter torso, and a reduced descending position allows the weight to sit in the middle of the centre of gravity, which is placed more posteriorly than in a lower-bar back squat. Low-Bar Back Squat (Lower Bar Position) Bar rests lower on the rear deltoids Torso leans forward slightly more Greater load on the glutes and posterior chain Favoured by powerlifters Best for developing hip strength and glute activation Ideally, your feet are nice and flat on the ground from heel to toes. On the other hand, the lower-bar back squat, as anticipated, is more for the posterior chain muscles, like the gluteus max. This is possible because the bending forward of the trunk stretches more muscle fibres in their origin point (the posterior aspect of the ilium (the pelvic bone), the sacrum, and the coccyx), allowing more fibre contraction in the ascending movement. Also, the lower position of the bar and the bending of the torso maintain the weight in the middle of the centre of mass, which is pushed forward at this time. How about if I cannot squat deep? The depth of a squat is the distance that you can cover from a standing position to the lowest point you can reach. How deep you can squat will definitely change which muscle groups you can activate, but not everyone can squat deep —and that’s absolutely ok. Each of us has biomechanics that are different, due to differences in how the skeleton is shaped. Without going into many details in this blog, we can definitely say that those who have a longer femur would have a harder time going for a deep squat, compared to those who have a shorter femur. The femur’s length is compared to that of the torso. But this is not all, indeed, there are also other femur and hip characteristics that can limit how deep you can squat, such as an anteverted or retroverted femur head. Other conditions that can get in the way while you squat are hip impingement. Accessory Work for a Complete Lower Leg Program So, knowing when and why to use each back squat variation can help tailor your program toward specific goals or help rehab muscle imbalances through focused intent. No squat is right, no squat is wrong; it is all about your goal. However, we need to add work more specifically with other exercises for strength symmetry, muscle activation, and injury prevention. Quad Curl (Leg Extension) Isolates the quadriceps Improves knee tracking and squat depth Essential in rehab for knee pain or quad weakness Quads curl can be done in many ways, with a cable machine or on a bench with a quads curl attachment, but even with a kettlebell or resistance band. It all depends on your setup. As per all the exercises, be consistent with your set-up and progressions. What I prefer most for my training, and what I offer to my patients during the fitness class, is to do quad curls on a bench with the attachment for quad curls. The advantages of this set-up are: Confort Easy progressions Easy set-up Inclination of the back at about 45° to 65° and slight elevation of the quads. The last point is essential to ensure we engage both ends of the quadriceps femoris, which is one of the four quads, that crosses both the hip and knee joints. Hamstring Curl Focuses on the hamstrings, which during a squat are often undertrained Strengthens the back of the thigh and supports knee stability A must-have for runners and athletes prone to hamstring strains As per the quad curl, even the hamstring curl can be done with different variations; there is never one way to train those muscles, but again, it is all about the efficiency and the amount of load that we can put through the muscle, which makes a difference. And again, what I can offer at Melbourne Massage and Treatment, in Fitzroy North, is to do these exercises on a bench, using this time a lower inclination for the upper body (which is now in a prone position) so that the origin of […]